LibreOffice Impress Insert Menu in Hindi || MCQ and True False of LibreOffice Impress Menu

Libreoffice-Impress-Insert-Menu

LibreOffice Impress Insert Menu क्या है?


अगर आप CCC या किसी अन्य competitive exam की तैयारी कर रहे हैं, तो आपको LibreOffice Impress Insert menu के बारे में विस्तार से जानने की जरूरत है। इस पोस्ट में हम LibreOffice Impress Insert menu के सभी महत्वपूर्ण ऑप्शन को विस्तार से समझाएंगे। साथ ही, आपको कुछ MCQs, true/false questions, FAQs, और shortcuts भी मिलेंगे, जो आपकी तैयारी में बहुत मददगार साबित होंगे। यह जानकारी सरल भाषा में दी गई है, ताकि आपको समझने में कोई दिक्कत न हो और आप अपने एग्जाम में अच्छे नंबर ला सकें।
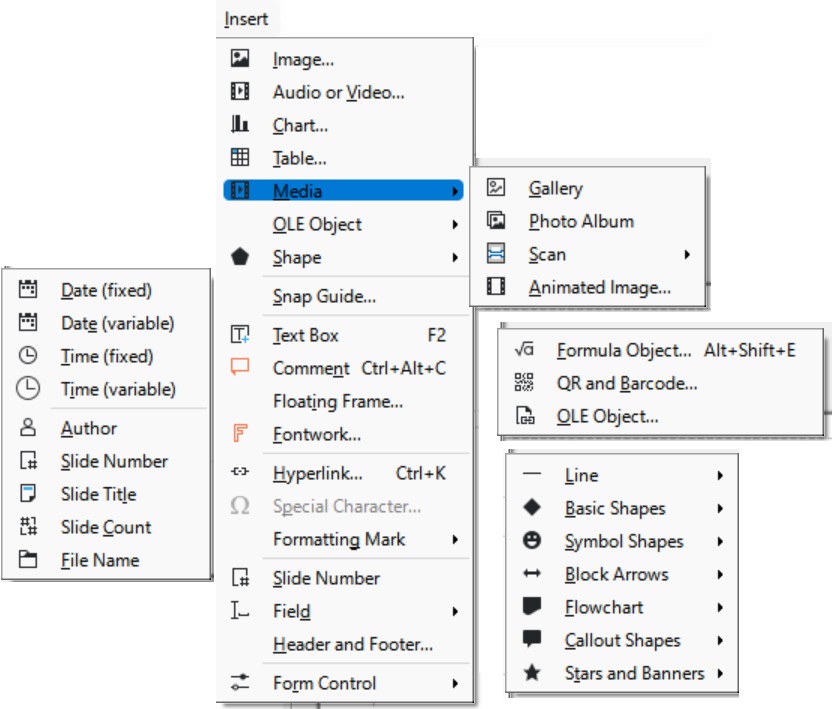
  1. Image…:
    • इस विकल्प का उपयोग करके आप अपने प्रेजेंटेशन में चित्र जोड़ सकते हैं।
  2. Audio or Video…:
    • इस विकल्प से आप ऑडियो या वीडियो फाइलें जोड़ सकते हैं, जिससे प्रेजेंटेशन इंटरएक्टिव हो जाता है।
  3. Chart…:
    • इस विकल्प से आप चार्ट जोड़ सकते हैं, जिससे डाटा का दृश्य (visual) प्रतिनिधित्व किया जा सके।
  4. Table…:
    • इस विकल्प का उपयोग करके डेटा को सारणीबद्ध (tabular) रूप में प्रस्तुत किया जा सकता है।
  5. Media:
    • Gallery: इस विकल्प से आप लाइब्रेरी में मौजूद images का उपयोग कर सकते हैं।
    • Photo Album: एक साथ कई फोटो जोड़ने के लिए।
    • Scan: स्कैनर से स्कैन की गई images को सीधे प्रेजेंटेशन में जोड़ने के लिए।
    • Animated Image…: एनिमेटेड इमेज या GIFs जोड़ने के लिए।
  6. OLE Object:
    • Formula Object… (Alt+Shift+E): इस विकल्प का उपयोग फार्मूला जोड़ने के लिए किया जाता है।
    • QR and Barcode…: प्रेजेंटेशन में QR कोड या Barcode जोड़ने के लिए।
    • OLE Object…: अन्य OLE objects जोड़ने के लिए।
  7. Shape:
    • Line: सरल लाइन जोड़ने के लिए।
    • Basic Shapes: बेसिक आकार जैसे rectangle, circle, आदि।
    • Symbol Shapes: प्रतीकात्मक आकार (symbolic shapes) जोड़ने के लिए।
    • Block Arrows: ब्लॉक तीर (arrows) जोड़ने के लिए।
    • Flowchart: फ्लोचार्ट के आकार जोड़ने के लिए।
    • Callout Shapes: टेक्स्ट के लिए कॉलआउट आकार जोड़ने के लिए।
    • Stars and Banners: स्टार्स और बैनर जोड़ने के लिए।
  8. Snap Guide…:
    • स्लाइड के कंटेंट को सही लाइनिंग के साथ व्यवस्थित करने के लिए स्नैप गाइड का उपयोग किया जाता है।
  9. Text Box (F2):
    • इस विकल्प से टेक्स्ट बॉक्स जोड़ सकते हैं ताकि उसमें टेक्स्ट लिख सकें।
  10. Comment (Ctrl+Alt+C):
  • प्रेजेंटेशन में टिप्पणियाँ जोड़ने के लिए।
  1. Floating Frame…:
  • फ्लोटिंग फ्रेम जोड़ने के लिए, जो आपके कंटेंट को स्वतंत्र रूप से फ्लोट करने की सुविधा देता है।
  1. Fontwork…:
  • Fontwork का उपयोग सजावटी टेक्स्ट जोड़ने के लिए किया जाता है।
  1. Hyperlink… (Ctrl+K):
  • इस विकल्प का उपयोग हाइपरलिंक जोड़ने के लिए किया जाता है, जिससे किसी वेबसाइट या दस्तावेज़ से लिंक किया जा सकता है।
  1. Special Character…:
  • इस विकल्प से आप विशेष वर्ण (special characters) जैसे प्रतीक, उच्चारण आदि जोड़ सकते हैं।
  1. Formatting Mark:
  • इस विकल्प से आप फॉर्मेटिंग निशान दिखा सकते हैं, जो टेक्स्ट के स्वरूप को समझने में मदद करता है।
  1. Slide Number:
  • स्लाइड पर स्लाइड नंबर जोड़ने के लिए।
  1. Field:
  • Date (fixed): स्थायी तिथि जोड़ने के लिए।
  • Date (variable): बदलती हुई तिथि जोड़ने के लिए।
  • Time (fixed): स्थायी समय जोड़ने के लिए।
  • Time (variable): बदलती हुई समय जोड़ने के लिए।
  • Author: लेखक का नाम जोड़ने के लिए।
  • Slide Number: स्लाइड नंबर जोड़ने के लिए।
  • Slide Title: स्लाइड का शीर्षक जोड़ने के लिए।
  • Slide Count: कुल स्लाइड की संख्या जोड़ने के लिए।
  • File Name: फाइल का नाम जोड़ने के लिए।
  1. Header and Footer…:
  • स्लाइड पर हैडर और फुटर जोड़ने के लिए।
  1. Form Control:
  • यह विकल्प फॉर्म कंट्रोल जैसे बटन, चेक बॉक्स, आदि जोड़ने के लिए उपयोग किया जाता है।

ये सभी विकल्प LibreOffice Impress के Insert Menu में उपलब्ध हैं और प्रेजेंटेशन को अधिक प्रभावी और आकर्षक बनाने में सहायता करते हैं।

50 MCQs on LibreOffice Impress Insert Menu

  1. LibreOffice Impress में ‘Text Box’ जोड़ने के लिए कौन सा विकल्प चुनें?
    Which option is used to add a ‘Text Box’ in LibreOffice Impress?
    • a) Insert > Text Box
    • b) Insert > Image
    • c) Insert > Table
    • d) Insert > Chart
  2. ‘Image’ को स्लाइड पर जोड़ने के लिए कौन सा विकल्प है?
    Which option is used to add an ‘Image’ to the slide?
    • a) Insert > Image
    • b) Insert > Chart
    • c) Insert > Shape
    • d) Insert > Table
  3. ‘Media’ विकल्प का उपयोग कैसे करें?
    How do you use the ‘Media’ option?
    • a) Insert > Media > Select video or audio file
    • b) Insert > Image
    • c) Insert > Text Box
    • d) Insert > Shape
  4. ‘Hyperlink’ जोड़ने के लिए कौन सा विकल्प चुनें?
    Which option should you choose to add a ‘Hyperlink’?
    • a) Insert > Hyperlink
    • b) Insert > Image
    • c) Insert > Table
    • d) Insert > Chart
  5. ‘Shapes’ में क्या-क्या आकृतियाँ शामिल हैं?
    What shapes are included in ‘Shapes’?
    • a) Geometric shapes like rectangles, circles, and lines
    • b) Text boxes
    • c) Images
    • d) Charts
  6. ‘Slide Number’ को कैसे जोड़ें?
    How can you add a ‘Slide Number’?
    • a) Insert > Slide Number
    • b) Insert > Date and Time
    • c) Insert > Media
    • d) Insert > Hyperlink
  7. ‘Header and Footer’ में क्या जोड़ सकते हैं?
    What can you add in ‘Header and Footer’?
    • a) Headers, footers, and slide numbers
    • b) Charts
    • c) Images
    • d) Shapes
  8. ‘Date and Time’ जोड़ने के लिए कौन सा विकल्प है?
    Which option is used to add ‘Date and Time’?
    • a) Insert > Date and Time
    • b) Insert > Image
    • c) Insert > Media
    • d) Insert > Table
  9. ‘Slide Transition’ क्या है?
    What is ‘Slide Transition’?
    • a) Visual effects applied between slides
    • b) Adding text boxes
    • c) Inserting images
    • d) Creating shapes
  10. ‘Object’ विकल्प का उपयोग कैसे करें?
    How to use the ‘Object’ option?
    • a) Insert > Object > Choose object type
    • b) Insert > Image
    • c) Insert > Text Box
    • d) Insert > Table
  11. ‘Charts’ जोड़ने के लिए कौन सा विकल्प चुनें?
    Which option should you choose to add ‘Charts’?
    • a) Insert > Chart
    • b) Insert > Table
    • c) Insert > Image
    • d) Insert > Media
  12. ‘Tables’ कैसे जोड़ें?
    How can you add ‘Tables’?
    • a) Insert > Table
    • b) Insert > Chart
    • c) Insert > Image
    • d) Insert > Media
  13. ‘Custom Animation’ का उपयोग कैसे करें?
    How to use ‘Custom Animation’?
    • a) Insert > Custom Animation > Select animation type
    • b) Insert > Media
    • c) Insert > Image
    • d) Insert > Table
  14. ‘Slide Layout’ बदलने के लिए कौन सा विकल्प है?
    Which option is used to change ‘Slide Layout’?
    • a) Insert > Slide Layout
    • b) Insert > Header and Footer
    • c) Insert > Media
    • d) Insert > Chart
  15. ‘Background’ को कैसे बदलें?
    How to change the ‘Background’?
    • a) Insert > Background
    • b) Insert > Image
    • c) Insert > Table
    • d) Insert > Media
  16. ‘Master Slide’ में क्या बदलाव कर सकते हैं?
    What changes can be made in the ‘Master Slide’?
    • a) Design and layout of slides
    • b) Adding images
    • c) Adding charts
    • d) Inserting text boxes
  17. ‘Slide Design’ को कैसे लागू करें?
    How to apply ‘Slide Design’?
    • a) Insert > Slide Design
    • b) Insert > Header and Footer
    • c) Insert > Media
    • d) Insert > Table
  18. ‘Notes’ जोड़ने के लिए कौन सा विकल्प है?
    Which option is used to add ‘Notes’?
    • a) Insert > Notes
    • b) Insert > Chart
    • c) Insert > Image
    • d) Insert > Table
  19. ‘Sound’ जोड़ने के लिए कौन सा विकल्प है?
    Which option should you choose to add ‘Sound’?
    • a) Insert > Sound
    • b) Insert > Image
    • c) Insert > Chart
    • d) Insert > Table
  20. ‘Guidelines’ का उपयोग कैसे करें?
    How to use ‘Guidelines’?
    • a) Insert > Guidelines
    • b) Insert > Image
    • c) Insert > Chart
    • d) Insert > Media
  21. ‘Text Box’ का उपयोग कहाँ किया जाता है?
    Where is the ‘Text Box’ used?
    • a) To add textual content to slides
    • b) To add images
    • c) To insert tables
    • d) To apply slide transitions
  22. ‘Clip Art’ जोड़ने के लिए कौन सा विकल्प है?
    Which option is used to add ‘Clip Art’?
    • a) Insert > Clip Art
    • b) Insert > Media
    • c) Insert > Table
    • d) Insert > Chart
  23. ‘Header’ जोड़ने के लिए कौन सा विकल्प है?
    Which option is used to add a ‘Header’?
    • a) Insert > Header
    • b) Insert > Footer
    • c) Insert > Table
    • d) Insert > Chart
  24. ‘Footer’ जोड़ने के लिए कौन सा विकल्प है?
    Which option should you choose to add a ‘Footer’?
    • a) Insert > Footer
    • b) Insert > Header
    • c) Insert > Media
    • d) Insert > Text Box
  25. ‘Date’ जोड़ने के लिए कौन सा विकल्प है?
    Which option is used to add ‘Date’?
    • a) Insert > Date
    • b) Insert > Media
    • c) Insert > Chart
    • d) Insert > Table
  26. ‘Time’ जोड़ने के लिए कौन सा विकल्प है?
    Which option is used to add ‘Time’?
    • a) Insert > Time
    • b) Insert > Chart
    • c) Insert > Media
    • d) Insert > Table
  27. ‘Background Image’ को कैसे जोड़ें?
    How to add a ‘Background Image’?
    • a) Insert > Background Image
    • b) Insert > Image
    • c) Insert > Media
    • d) Insert > Chart
  28. ‘Slide Number’ को केवल स्लाइड पर जोड़ने के लिए किया जाता है।
    ‘Slide Number’ is used only to add numbers to slides. (True/False)
  29. ‘Custom Animation’ केवल टेक्स्ट बॉक्स जोड़ने के लिए उपयोगी है।
    ‘Custom Animation’ is useful only for adding text boxes. (True/False)
  30. ‘Media’ का उपयोग केवल ऑडियो फ़ाइलें जोड़ने के लिए किया जाता है।
    ‘Media’ is used only for adding audio files. (True/False)
  31. ‘Hyperlink’ केवल वेबसाइट लिंक जोड़ने के लिए उपयोगी है।
    ‘Hyperlink’ is useful only for adding website links. (True/False)
  32. ‘Shapes’ में केवल ज्यामितीय आकृतियाँ शामिल होती हैं।
    ‘Shapes’ includes only geometric shapes. (True/False)
  33. ‘Slide Layout’ को स्लाइड डिज़ाइन बदलने के लिए उपयोग किया जाता है।
    ‘Slide Layout’ is used to change slide design. (True/False)
  34. ‘Background’ को स्लाइड की पृष्ठभूमि बदलने के लिए उपयोग किया जाता है।
    ‘Background’ is used to change the slide’s background. (True/False)
  35. ‘Master Slide’ का उपयोग स्लाइड के डिज़ाइन को नियंत्रित करने के लिए किया जाता है।
    ‘Master Slide’ is used to control the slide design. (True/False)
  36. ‘Slide Design’ केवल नए स्लाइड जोड़ने के लिए उपयोगी है।
    ‘Slide Design’ is useful only for adding new slides. (True/False)
  37. ‘Notes’ केवल नोट्स जोड़ने के लिए उपयोगी है।
    ‘Notes’ is useful only for adding notes. (True/False)
  38. ‘Sound’ का उपयोग केवल ध्वनि फ़ाइलें जोड़ने के लिए किया जाता है।
    ‘Sound’ is used only for adding sound files. (True/False)
  39. ‘Guidelines’ का उपयोग केवल टेक्स्ट बॉक्स जोड़ने के लिए किया जाता है।
    ‘Guidelines’ is used only for adding text boxes. (True/False)
  40. ‘Clip Art’ केवल चित्र जोड़ने के लिए उपयोगी है।
    ‘Clip Art’ is useful only for adding pictures. (True/False)
  41. ‘Header’ और ‘Footer’ केवल डिज़ाइन के लिए उपयोगी हैं।
    ‘Header’ and ‘Footer’ are useful only for design purposes. (True/False)
  42. ‘Date’ और ‘Time’ केवल ऑब्जेक्ट्स जोड़ने के लिए उपयोगी हैं।
    ‘Date’ and ‘Time’ are useful only for adding objects. (True/False)
  43. ‘Background Image’ को केवल स्लाइड पृष्ठभूमि बदलने के लिए उपयोग किया जाता है।
    ‘Background Image’ is used only to change the slide’s background. (True/False)
  44. ‘Slide Number’ केवल नई स्लाइड जोड़ने के लिए उपयोगी है।
    ‘Slide Number’ is useful only for adding new slides. (True/False)
  45. ‘Custom Animation’ केवल चार्ट जोड़ने के लिए उपयोगी है।
    ‘Custom Animation’ is useful only for adding charts. (True/False)
  46. ‘Media’ केवल टेक्स्ट बॉक्स जोड़ने के लिए उपयोगी है।
    ‘Media’ is useful only for adding text boxes. (True/False)
  47. ‘Hyperlink’ केवल ऑब्जेक्ट्स जोड़ने के लिए उपयोगी है।
    ‘Hyperlink’ is useful only for adding objects. (True/False)
  48. ‘Shapes’ केवल चित्र जोड़ने के लिए उपयोगी है।
    ‘Shapes’ is useful only for adding images. (True/False)
  49. ‘Slide Layout’ केवल स्लाइड के डिज़ाइन को बदलने के लिए उपयोगी है।
    ‘Slide Layout’ is useful only for changing the slide design. (True/False)
  50. ‘Background’ केवल चार्ट जोड़ने के लिए उपयोगी है।
    ‘Background’ is useful only for adding charts. (True/False)

Answers to the 50 MCQs

  1. a) Insert > Text Box
  2. a) Insert > Image
  3. a) Insert > Media > Select video or audio file
  4. a) Insert > Hyperlink
  5. a) Geometric shapes like rectangles, circles, and lines
  6. a) Insert > Slide Number
  7. a) Headers, footers, and slide numbers
  8. a) Insert > Date and Time
  9. a) Visual effects applied between slides
  10. a) Insert > Object > Choose object type
  11. a) Insert > Chart
  12. a) Insert > Table
  13. a) Insert > Custom Animation > Select animation type
  14. a) Insert > Slide Layout
  15. a) Insert > Background
  16. a) Design and layout of slides
  17. a) Insert > Slide Design
  18. a) Insert > Notes
  19. a) Insert > Sound
  20. a) Insert > Guidelines
  21. a) To add textual content to slides
  22. a) Insert > Clip Art
  23. a) Insert > Header
  24. a) Insert > Footer
  25. a) Insert > Date
  26. a) Insert > Time
  27. a) Insert > Background Image
  28. True
  29. False
  30. False
  31. True
  32. True
  33. False
  34. True
  35. True
  36. False
  37. True
  38. True
  39. False
  40. True
  41. False
  42. False
  43. True
  44. False
  45. False
  46. False
  47. False
  48. False
  49. True
  50. False

50 True/False Questions on LibreOffice Impress Insert Menu

  1. ‘Text Box’ जोड़ने से स्लाइड पर केवल टेक्स्ट जोड़ा जा सकता है।
    Adding a ‘Text Box’ allows you to add only text to the slide. (True/False)
  2. ‘Image’ विकल्प से आप केवल चित्र जोड़ सकते हैं, टेक्स्ट नहीं।
    The ‘Image’ option allows you to add only pictures, not text. (True/False)
  3. ‘Media’ का उपयोग वीडियो और ऑडियो फ़ाइलें जोड़ने के लिए किया जाता है।
    The ‘Media’ option is used to add video and audio files. (True/False)
  4. ‘Hyperlink’ केवल एक वेबसाइट लिंक जोड़ने के लिए उपयोगी है।
    The ‘Hyperlink’ is useful only for adding a website link. (True/False)
  5. ‘Shapes’ में आपको विभिन्न प्रकार की ज्यामितीय आकृतियाँ मिलती हैं।
    ‘Shapes’ provides various types of geometric shapes. (True/False)
  6. ‘Slide Number’ केवल स्लाइड की संख्या जोड़ने के लिए उपयोगी है।
    ‘Slide Number’ is useful only for adding slide numbers. (True/False)
  7. ‘Header and Footer’ को स्लाइड के शीर्ष और निचले हिस्से में जोड़ने के लिए उपयोग किया जाता है।
    ‘Header and Footer’ are used to add content to the top and bottom of slides. (True/False)
  8. ‘Date and Time’ विकल्प से आप केवल वर्तमान तारीख और समय जोड़ सकते हैं।
    The ‘Date and Time’ option allows you to add only the current date and time. (True/False)
  9. ‘Slide Transition’ से स्लाइड पर कोई नया कंटेंट जोड़ा जा सकता है।
    ‘Slide Transition’ is used to add new content to the slide. (True/False)
  10. ‘Object’ विकल्प का उपयोग आप केवल चित्र जोड़ने के लिए कर सकते हैं।
    The ‘Object’ option can be used only for adding pictures. (True/False)
  11. ‘Charts’ केवल डेटा को ग्राफिकल रूप में दिखाने के लिए उपयोग किया जाता है।
    ‘Charts’ is used only to display data graphically. (True/False)
  12. ‘Tables’ को जोड़ने के लिए आप ‘Insert > Table’ विकल्प का उपयोग करते हैं।
    To add ‘Tables’, you use the ‘Insert > Table’ option. (True/False)
  13. ‘Custom Animation’ केवल टेक्स्ट के लिए उपयोगी है, ऑब्जेक्ट्स के लिए नहीं।
    ‘Custom Animation’ is useful only for text, not for objects. (True/False)
  14. ‘Slide Layout’ से आप स्लाइड का डिज़ाइन बदल सकते हैं।
    ‘Slide Layout’ allows you to change the slide’s design. (True/False)
  15. ‘Background’ केवल चित्र जोड़ने के लिए उपयोग किया जाता है।
    ‘Background’ is used only to add pictures. (True/False)
  16. ‘Master Slide’ का उपयोग स्लाइड के डिज़ाइन को नियंत्रित करने के लिए किया जाता है।
    ‘Master Slide’ is used to control the slide’s design. (True/False)
  17. ‘Slide Design’ केवल नई स्लाइड जोड़ने के लिए उपयोगी है।
    ‘Slide Design’ is useful only for adding new slides. (True/False)
  18. ‘Notes’ का उपयोग स्लाइड पर टिप्पणी जोड़ने के लिए किया जाता है।
    ‘Notes’ is used to add comments to slides. (True/False)
  19. ‘Sound’ जोड़ने के लिए ‘Insert > Sound’ विकल्प का उपयोग किया जाता है।
    To add ‘Sound’, you use the ‘Insert > Sound’ option. (True/False)
  20. ‘Guidelines’ को स्लाइड पर निर्देश जोड़ने के लिए उपयोग किया जाता है।
    ‘Guidelines’ is used to add directions to slides. (True/False)
  21. ‘Text Box’ से केवल पाठ जोड़ सकते हैं, चित्र नहीं।
    You can only add text using a ‘Text Box’, not pictures. (True/False)
  22. ‘Clip Art’ जोड़ने से आप केवल ग्राफिक्स जोड़ सकते हैं।
    ‘Clip Art’ allows you to add only graphics. (True/False)
  23. ‘Header’ को केवल स्लाइड के शीर्ष पर जोड़ने के लिए उपयोग किया जाता है।
    ‘Header’ is used only to add content to the top of slides. (True/False)
  24. ‘Footer’ को केवल स्लाइड के निचले हिस्से में जोड़ने के लिए उपयोग किया जाता है।
    ‘Footer’ is used only to add content to the bottom of slides. (True/False)
  25. ‘Date’ जोड़ने के लिए आप केवल वर्तमान तारीख ही जोड़ सकते हैं।
    When adding ‘Date’, you can only add the current date. (True/False)
  26. ‘Time’ जोड़ने के लिए ‘Insert > Time’ विकल्प का उपयोग किया जाता है।
    To add ‘Time’, you use the ‘Insert > Time’ option. (True/False)
  27. ‘Background Image’ केवल स्लाइड की पृष्ठभूमि बदलने के लिए उपयोगी है।
    ‘Background Image’ is useful only for changing the slide’s background. (True/False)
  28. ‘Slide Number’ को केवल स्लाइड की संख्या जोड़ने के लिए उपयोग किया जाता है।
    ‘Slide Number’ is used only for adding slide numbers. (True/False)
  29. ‘Custom Animation’ केवल टेक्स्ट के लिए उपयोगी है, अन्य ऑब्जेक्ट्स के लिए नहीं।
    ‘Custom Animation’ is useful only for text, not for other objects. (True/False)
  30. ‘Media’ का उपयोग केवल ऑडियो फ़ाइलें जोड़ने के लिए किया जाता है।
    ‘Media’ is used only for adding audio files. (True/False)
  31. ‘Hyperlink’ केवल वेबसाइट लिंक जोड़ने के लिए उपयोगी है, दस्तावेज़ लिंक के लिए नहीं।
    ‘Hyperlink’ is useful only for adding website links, not document links. (True/False)
  32. ‘Shapes’ में केवल ज्यामितीय आकृतियाँ शामिल होती हैं।
    ‘Shapes’ includes only geometric shapes. (True/False)
  33. ‘Slide Layout’ को स्लाइड के डिज़ाइन को बदलने के लिए उपयोग किया जाता है।
    ‘Slide Layout’ is used to change the slide’s design. (True/False)
  34. ‘Background’ केवल चित्र जोड़ने के लिए उपयोग किया जाता है।
    ‘Background’ is used only to add pictures. (True/False)
  35. ‘Master Slide’ केवल स्लाइड के शीर्षक को बदलने के लिए उपयोगी है।
    ‘Master Slide’ is useful only for changing slide titles. (True/False)
  36. ‘Slide Design’ केवल नई स्लाइड जोड़ने के लिए उपयोगी है।
    ‘Slide Design’ is useful only for adding new slides. (True/False)
  37. ‘Notes’ का उपयोग केवल नोट्स जोड़ने के लिए किया जाता है।
    ‘Notes’ is used only to add notes. (True/False)
  38. ‘Sound’ जोड़ने के लिए केवल ऑडियो फ़ाइलें ही उपयोग की जा सकती हैं।
    Only audio files can be used to add ‘Sound’. (True/False)
  39. ‘Guidelines’ का उपयोग केवल दृश्य दिशानिर्देश जोड़ने के लिए किया जाता है।
    ‘Guidelines’ is used only for adding visual guidelines. (True/False)
  40. ‘Clip Art’ केवल चित्र जोड़ने के लिए उपयोगी है।
    ‘Clip Art’ is useful only for adding pictures. (True/False)
  41. ‘Header’ और ‘Footer’ स्लाइड के शीर्ष और निचले हिस्से में जानकारी जोड़ने के लिए उपयोग किए जाते हैं।
    ‘Header’ and ‘Footer’ are used to add information to the top and bottom of slides. (True/False)
  42. ‘Date’ और ‘Time’ जोड़ने के लिए ‘Insert > Date and Time’ का उपयोग किया जाता है।
    ‘Insert > Date and Time’ is used to add ‘Date’ and ‘Time’. (True/False)
  43. ‘Background Image’ को केवल स्लाइड के पृष्ठभूमि बदलने के लिए उपयोग किया जाता है।
    ‘Background Image’ is used only for changing the slide’s background. (True/False)
  44. ‘Slide Number’ को स्लाइड में केवल स्लाइड की संख्या जोड़ने के लिए उपयोग किया जाता है।
    ‘Slide Number’ is used only to add the slide number. (True/False)
  45. ‘Custom Animation’ केवल टेक्स्ट को एनिमेट करने के लिए उपयोगी है।
    ‘Custom Animation’ is useful only for animating text. (True/False)
  46. ‘Media’ केवल वीडियो फ़ाइलें जोड़ने के लिए उपयोगी है।
    ‘Media’ is useful only for adding video files. (True/False)
  47. ‘Hyperlink’ केवल वेबसाइट लिंक जोड़ने के लिए उपयोगी है, दस्तावेज़ लिंक के लिए नहीं।
    ‘Hyperlink’ is useful only for adding website links, not document links. (True/False)
  48. ‘Shapes’ केवल ज्यामितीय आकृतियाँ जोड़ने के लिए उपयोगी है।
    ‘Shapes’ is useful only for adding geometric shapes. (True/False)
  49. ‘Slide Layout’ को केवल स्लाइड के डिज़ाइन को बदलने के लिए उपयोग किया जाता है।
    ‘Slide Layout’ is used only to change the slide design. (True/False)
  50. ‘Background’ केवल चित्र जोड़ने के लिए उपयोग किया जाता है।
    ‘Background’ is used only to add pictures. (True/False)

Answers

  1. True
  2. True
  3. True
  4. False
  5. True
  6. True
  7. True
  8. True
  9. False
  10. False
  11. True
  12. True
  13. False
  14. True
  15. False
  16. True
  17. False
  18. True
  19. True
  20. True
  21. True
  22. True
  23. True
  24. True
  25. True
  26. True
  27. True
  28. True
  29. False
  30. False
  31. False
  32. True
  33. True
  34. False
  35. False
  36. False
  37. True
  38. True
  39. True
  40. True
  41. True
  42. True
  43. True
  44. True
  45. False
  46. False
  47. False
  48. True
  49. True
  50. False

20 Important FAQs on LibreOffice Impress Insert Menu

  1. Q: ‘Text Box’ जोड़ने के लिए कौन सा विकल्प उपयोग करें?
    A: Which option should you use to add a ‘Text Box’?
    A: ‘Insert > Text Box’
  2. Q: ‘Image’ जोड़ने के लिए कौन सा विकल्प है?
    A: Which option is used to add an ‘Image’?
    A: ‘Insert > Image’
  3. Q: ‘Media’ विकल्प से क्या जोड़ा जा सकता है?
    A: What can be added using the ‘Media’ option?
    A: Video and audio files
  4. Q: ‘Hyperlink’ जोड़ने के लिए कौन सा मेनू विकल्प है?
    A: Which menu option is used to add a ‘Hyperlink’?
    A: ‘Insert > Hyperlink’
  5. Q: ‘Shapes’ में क्या प्रकार की आकृतियाँ उपलब्ध हैं?
    A: What types of shapes are available in ‘Shapes’?
    A: Geometric shapes like rectangles, circles, and lines
  6. Q: ‘Slide Number’ जोड़ने के लिए कौन सा विकल्प उपयोग करें?
    A: Which option should be used to add ‘Slide Number’?
    A: ‘Insert > Slide Number’
  7. Q: ‘Header and Footer’ का उपयोग किस लिए किया जाता है?
    A: What is the ‘Header and Footer’ used for?
    A: To add content to the top and bottom of slides
  8. Q: ‘Date and Time’ कैसे जोड़ सकते हैं?
    A: How can you add ‘Date and Time’?
    A: Use ‘Insert > Date and Time’
  9. Q: ‘Slide Transition’ क्या है और इसका उपयोग कैसे किया जाता है?
    A: What is ‘Slide Transition’ and how is it used?
    A: It is used to apply visual effects between slides
  10. Q: ‘Object’ जोड़ने के लिए कौन सा विकल्प है?
    A: Which option is used to add an ‘Object’?
    A: ‘Insert > Object’
  11. Q: ‘Chart’ जोड़ने के लिए कौन सा विकल्प प्रयोग करें?
    A: Which option should be used to add a ‘Chart’?
    A: ‘Insert > Chart’
  12. Q: ‘Table’ जोड़ने के लिए कौन सा विकल्प है?
    A: Which option is used to add a ‘Table’?
    A: ‘Insert > Table’
  13. Q: ‘Custom Animation’ कैसे लागू करें?
    A: How do you apply ‘Custom Animation’?
    A: Use ‘Insert > Custom Animation’
  14. Q: ‘Slide Layout’ में कौन-कौन से डिज़ाइन विकल्प उपलब्ध हैं?
    A: What design options are available in ‘Slide Layout’?
    A: Various pre-defined slide layouts for different purposes
  15. Q: ‘Background’ में कौन सी छवियाँ जोड़ सकते हैं?
    A: What images can be added in ‘Background’?
    A: Background images to change the slide’s appearance
  16. Q: ‘Master Slide’ का उपयोग कैसे करें?
    A: How do you use the ‘Master Slide’?
    A: To control the overall design and layout of slides
  17. Q: ‘Slide Design’ क्या है और इसका उपयोग कैसे किया जाता है?
    A: What is ‘Slide Design’ and how is it used?
    A: It is used to modify the design of slides
  18. Q: ‘Notes’ जोड़ने के लिए कौन सा विकल्प है?
    A: Which option is used to add ‘Notes’?
    A: ‘Insert > Notes’
  19. Q: ‘Sound’ जोड़ने के लिए कौन सा मेनू विकल्प है?
    A: Which menu option is used to add ‘Sound’?
    A: ‘Insert > Sound’
  20. Q: ‘Guidelines’ का उपयोग किस उद्देश्य के लिए किया जाता है?
    A: What is the purpose of using ‘Guidelines’?
    A: To add visual guidelines for layout and alignment

LibreOffice Impress Insert Menu के शॉर्टकट

  1. Text Box (टेक्स्ट बॉक्स): Ctrl + Shift + T
  2. Image (चित्र): Ctrl + Shift + I
  3. Media (मीडिया): Ctrl + M
  4. Hyperlink (हाइपरलिंक): Ctrl + K
  5. Shapes (आकृतियाँ): Ctrl + Shift + F
  6. Slide Number (स्लाइड नंबर): Ctrl + Shift + N
  7. Header and Footer (हेडर और फूटर): Ctrl + Shift + H
  8. Date and Time (तारीख और समय): Ctrl + Shift + D
  9. Chart (चार्ट): Ctrl + Shift + C
  10. Table (तालिका): Ctrl + Shift + L
  11. Slide Layout (स्लाइड लेआउट): Ctrl + Shift + Y

कुछ क्रियाएँ डिफ़ॉल्ट शॉर्टकट के बिना होती हैं और इन्हें इन्सर्ट मेनू से एक्सेस किया जाता है। आप Tools > Customize > Keyboard में जाकर शॉर्टकट को कस्टमाइज़ कर सकते हैं।

How to use LibreOffice writer Style Menu in Hindi and English || LibreOffice writer MCQ and True False in Hindi and English

CCC परीक्षा का सिलेबस मे LibreOffice Writer का Style मेनू एक उपयोगी टूल है जो आपको documents को संपादित (Format) करने के विभिन्न विकल्प प्रदान करता है। यह मेनू विभिन्न विकल्पों के माध्यम से टेक्स्ट (letters) और दस्तावेज़ (files) के अन्य तत्वों को संशोधित /Format करने की सुविधा देता है। आइए इसके मुख्य विकल्पों पर एक नज़र डालते हैं:

Style Menu of Libre

LibreOffice Writer Styles Menu – Detailed Notes in Hindi

Style Menu With true false and MCQ


Select किए गए Text पर विभिन्न प्रकार की Styles Apply करने के लिए इसका उपयोग किया जाता है। इसके अंतर्गत कई Options दिए गए हैं, जो निम्नलिखित हैं:

TEXT BODY: Selected Text को Default Style में करने के लिए इसका उपयोग किया जाता है।

TITLE: Selected Text को Title के रूप में फॉर्मेट करने के लिए इसका उपयोग किया जाता है।

SUBTITLE: Selected Text को Subtitle के रूप में फॉर्मेट करने के लिए इसका उपयोग किया जाता है।

HEADING 1 {CTRL + 1}: Selected Text को Heading की तरह फॉर्मेट करने के लिए इसका उपयोग किया जाता है।

HEADING 2 {CTRL + 2}: दूसरी Heading बनाने के लिए इसका उपयोग किया जाता है।

HEADING 3 {CTRL + 3}: तीसरी Heading बनाने के लिए इसका उपयोग किया जाता है।

QUOTATIONS: Selected Text को Quote की तरह फॉर्मेट करने के लिए इसका उपयोग किया जाता है।

PREFORMATTED TEXT: Selected Text पर पहले से निर्धारित Formatting को Apply करने के लिए इसका उपयोग किया जाता है।

DEFAULT CHARACTER: Selected Text को उसकी Default Style में करने के लिए इसका उपयोग किया जाता है।

EMPHASIS: Selected Text पर प्रभाव डालने के लिए इसका उपयोग किया जाता है। यह Selected Text को तिरछा कर देता है।

STRONG EMPHASIS: यह Selected Text को मोटा कर देता है।

SOURCE TEXT: Text को उसकी Default Style में करने के लिए इसका उपयोग किया जाता है।

BULLET LIST: Selected Text से पहले Bullet Style Apply करने के लिए इसका उपयोग किया जाता है।

NUMBER LIST: Selected Text से पहले Number Style Apply करने के लिए इसका उपयोग किया जाता है।

ALPHABET UPPERCASE LIST: Number Style का पहला अक्षर Uppercase में करने के लिए इसका उपयोग किया जाता है।

ALPHABET LOWERCASE LIST: Number Style का अक्षर Lowercase में करने के लिए इसका उपयोग किया जाता है।

ROMAN UPPERCASE LIST: Number Style में Roman अंक को Uppercase में करने के लिए इसका उपयोग किया जाता है।

ROMAN LOWERCASE LIST: Number Style में Roman अंक को Lowercase में करने के लिए इसका उपयोग किया जाता है।

EDIT STYLE: Apply की गयी Styles को Edit करने के लिए इसका उपयोग किया जाता है।

UPDATE SELECTED STYLE {CTRL + SHIFT + F11}: Selected Style को Update करने के लिए इसका उपयोग किया जाता है।

NEW STYLE FROM SELECTION {SHIFT + F11}: Selected Text पर विभिन्न प्रकार के Styles Apply करने के लिए इसका उपयोग किया जाता है।

LOAD STYLES: और भी Styles Load करने के लिए इसका उपयोग किया जाता है।

MANAGE STYLES {F11}: अपनी आवश्यकता अनुसार Styles को Manage करने के लिए इसका उपयोग किया जाता है।

Shortcut Key of Libreoffice writer Style Menu in Hindi

  1. Heading 1 (CTRL + 1):

    • Select किए गए टेक्स्ट को Heading 1 की तरह फॉर्मेट करने के लिए।
  2. Heading 2 (CTRL + 2):

    • Select किए गए टेक्स्ट को Heading 2 की तरह फॉर्मेट करने के लिए।
  3. Heading 3 (CTRL + 3):

    • Select किए गए टेक्स्ट को Heading 3 की तरह फॉर्मेट करने के लिए।
  4. Update Selected Style (CTRL + SHIFT + F11):

    • Select की गई स्टाइल को अपडेट करने के लिए।
  5. New Style from Selection (SHIFT + F11):

    • Select किए गए टेक्स्ट पर नई स्टाइल लागू करने के लिए।
  6. Manage Styles (F11):

    • स्टाइल्स को मैनेज करने के लिए।

Most Important MCQ of LibreOffice Writer Style Menu

  1. English: The “Paragraph Style” option is found under the Format menu. Hindi: “पैराग्राफ स्टाइल” विकल्प फॉर्मेट मेनू के तहत पाया जाता है।

    • True or False?
  2. English: You can create a new style by right-clicking in the Styles and Formatting window. Hindi: स्टाइल्स और फॉर्मेटिंग विंडो में राइट-क्लिक करके आप एक नई स्टाइल बना सकते हैं।

    • True or False?
  3. English: The “Character Style” option allows you to change the font size. Hindi: “कैरक्टर स्टाइल” विकल्प आपको फॉन्ट साइज बदलने की अनुमति देता है।

    • True or False?
  4. English: The “Page Style” option includes settings for page margins. Hindi: “पेज स्टाइल” विकल्प में पेज मार्जिन के लिए सेटिंग्स शामिल हैं।

    • True or False?
  5. English: The “Frame Style” option is used to format tables. Hindi: “फ्रेम स्टाइल” विकल्प का उपयोग टेबल्स को फॉर्मेट करने के लिए किया जाता है।

    • True or False?
  6. English: The “List Style” option helps in formatting bullet points and numbering. Hindi: “लिस्ट स्टाइल” विकल्प बुलेट पॉइंट्स और नंबरिंग को फॉर्मेट करने में मदद करता है।

    • True or False?
  7. English: You can import styles from another document in LibreOffice Writer. Hindi: आप LibreOffice Writer में किसी अन्य दस्तावेज़ से स्टाइल्स आयात कर सकते हैं।

    • True or False?
  8. English: The “Style Inspector” is a tool to view and manage styles. Hindi: “स्टाइल इंस्पेक्टर” स्टाइल्स को देखने और प्रबंधित करने का एक उपकरण है।

    • True or False?
  9. English: There is no way to apply multiple styles to a single paragraph in LibreOffice Writer. Hindi: LibreOffice Writer में एक ही पैराग्राफ पर एक से अधिक स्टाइल लागू करने का कोई तरीका नहीं है।

    • True or False?
  10. English: Styles in LibreOffice Writer can be linked to other styles. Hindi: LibreOffice Writer में स्टाइल्स को अन्य स्टाइल्स से जोड़ा जा सकता है।

    • True or False?
  11. English: The “Default Style” is the base style for all other styles in LibreOffice Writer. Hindi: “डिफ़ॉल्ट स्टाइल” LibreOffice Writer में सभी अन्य स्टाइल्स के लिए आधार स्टाइल है।

    • True or False?
  12. English: You cannot delete a style in LibreOffice Writer. Hindi: आप LibreOffice Writer में किसी स्टाइल को हटा नहीं सकते।

    • True or False?
  13. English: You can modify an existing style by double-clicking on it in the Styles and Formatting window. Hindi: स्टाइल्स और फॉर्मेटिंग विंडो में किसी स्टाइल पर डबल-क्लिक करके आप इसे संशोधित कर सकते हैं।

    • True or False?
  14. English: Page styles in LibreOffice Writer do not affect headers and footers. Hindi: LibreOffice Writer में पेज स्टाइल्स हेडर और फुटर को प्रभावित नहीं करते हैं।

    • True or False?
  15. English: The “Fill Format Mode” allows you to quickly apply a style to multiple elements. Hindi: “फिल फॉर्मेट मोड” आपको एक स्टाइल को कई तत्वों पर जल्दी से लागू करने की अनुमति देता है।

    • True or False?
  16. English: You can apply a style to text by using keyboard shortcuts. Hindi: कीबोर्ड शॉर्टकट का उपयोग करके आप टेक्स्ट पर स्टाइल लागू कर सकते हैं।

    • True or False?
  17. English: The “Outline & Numbering” tab is part of the Paragraph Style settings. Hindi: “आउटलाइन और नंबरिंग” टैब पैराग्राफ स्टाइल सेटिंग्स का हिस्सा है।

    • True or False?
  18. English: You can save custom styles as a template in LibreOffice Writer. Hindi: आप LibreOffice Writer में कस्टम स्टाइल्स को एक टेम्पलेट के रूप में सहेज सकते हैं।

    • True or False?
  19. English: Table styles are managed separately from paragraph styles in LibreOffice Writer. Hindi: टेबल स्टाइल्स को LibreOffice Writer में पैराग्राफ स्टाइल्स से अलग प्रबंधित किया जाता है।

    • True or False?
  20. English: The “Load Styles” function allows you to import styles from a template. Hindi: “लोड स्टाइल्स” फ़ंक्शन आपको एक टेम्पलेट से स्टाइल्स आयात करने की अनुमति देता है।

    • True or False?
  21. English: You can access the Styles menu from the main toolbar in LibreOffice Writer. Hindi: आप LibreOffice Writer में मुख्य टूलबार से स्टाइल्स मेनू तक पहुंच सकते हैं।

    • True or False?
  22. English: Paragraph styles control the spacing between paragraphs. Hindi: पैराग्राफ स्टाइल्स पैराग्राफ्स के बीच की स्पेसिंग को नियंत्रित करते हैं।

    • True or False?
  23. English: Character styles can include font color settings. Hindi: कैरेक्टर स्टाइल्स में फॉन्ट कलर सेटिंग्स शामिल हो सकती हैं।

    • True or False?
  24. English: The “AutoUpdate” feature updates all instances of a style when you change it. Hindi: “ऑटो अपडेट” फीचर एक स्टाइल को बदलने पर इसके सभी उदाहरणों को अपडेट करता है।

    • True or False?
  25. English: You can assign a shortcut key to a style in LibreOffice Writer. Hindi: आप LibreOffice Writer में किसी स्टाइल को शॉर्टकट कुंजी असाइन कर सकते हैं।

    • True or False?
  26. English: The “Styles and Formatting” window can be docked to the side of the screen. Hindi: “स्टाइल्स और फॉर्मेटिंग” विंडो को स्क्रीन के साइड में डॉक किया जा सकता है।

    • True or False?
  27. English: Page styles can change the orientation of the page. Hindi: पेज स्टाइल्स पेज के ओरिएंटेशन को बदल सकते हैं।

    • True or False?
  28. English: The “Hierarchical” view shows the relationship between different styles. Hindi: “हाइरार्किकल” व्यू विभिन्न स्टाइल्स के बीच संबंध दिखाता है।

    • True or False?
  29. English: You can lock a style to prevent changes in LibreOffice Writer. Hindi: आप LibreOffice Writer में किसी स्टाइल को बदलने से रोकने के लिए लॉक कर सकते हैं।

    • True or False?
  30. English: Styles can be used to generate a table of contents in LibreOffice Writer. Hindi: LibreOffice Writer में स्टाइल्स का उपयोग करके एक टेबल ऑफ कंटेंट्स जेनरेट किया जा सकता है।

    • True or False?

Answer

  1. True
  2. True
  3. True
  4. True
  5. False
  6. True
  7. True
  8. True
  9. False
  10. True
  11. True
  12. False
  13. True
  14. False
  15. True
  16. True
  17. True
  18. True
  19. True
  20. True
  21. True
  22. True
  23. True
  24. True
  25. True
  26. True
  27. True
  28. True
  29. False
  30. True

MCQ of LibreOffice Writer Style Menu in Hindi

  1. English: Where can you find the “Paragraph Style” option in LibreOffice Writer? Hindi: LibreOffice Writer में “पैराग्राफ स्टाइल” विकल्प कहाँ पाया जा सकता है?

    • A) File menu
    • B) Edit menu
    • C) Format menu
    • D) Tools menu
  2. English: How can you create a new style in LibreOffice Writer? Hindi: LibreOffice Writer में एक नई स्टाइल कैसे बनाई जा सकती है?

    • A) By clicking on the “New” button in the toolbar
    • B) By right-clicking in the Styles and Formatting window
    • C) By selecting it from the File menu
    • D) By pressing Ctrl+N
  3. English: Which option allows you to change the font size in LibreOffice Writer? Hindi: LibreOffice Writer में फॉन्ट साइज बदलने की अनुमति कौन सा विकल्प देता है?

    • A) Page Style
    • B) Frame Style
    • C) Character Style
    • D) List Style
  4. English: What does the “Page Style” option include? Hindi: “पेज स्टाइल” विकल्प में क्या शामिल है?

    • A) Font settings
    • B) Page margins
    • C) Bullet points
    • D) Table formatting
  5. English: Which option is used to format bullet points and numbering in LibreOffice Writer? Hindi: LibreOffice Writer में बुलेट पॉइंट्स और नंबरिंग को फॉर्मेट करने के लिए कौन सा विकल्प उपयोग किया जाता है?

    • A) Paragraph Style
    • B) Character Style
    • C) Page Style
    • D) List Style
  6. English: How can you import styles from another document? Hindi: आप किसी अन्य दस्तावेज़ से स्टाइल्स कैसे आयात कर सकते हैं?

    • A) By using the File menu
    • B) By using the Edit menu
    • C) By using the Styles menu
    • D) By using the Tools menu
  7. English: What is the purpose of the “Style Inspector” tool? Hindi: “स्टाइल इंस्पेक्टर” टूल का उद्देश्य क्या है?

    • A) To edit text
    • B) To view and manage styles
    • C) To print documents
    • D) To spell-check text
  8. English: Can you apply multiple styles to a single paragraph in LibreOffice Writer? Hindi: क्या आप LibreOffice Writer में एक ही पैराग्राफ पर एक से अधिक स्टाइल लागू कर सकते हैं?

    • A) Yes
    • B) No
    • C) Only with extensions
    • D) Only with a special command
  9. English: Can styles in LibreOffice Writer be linked to other styles? Hindi: क्या LibreOffice Writer में स्टाइल्स को अन्य स्टाइल्स से जोड़ा जा सकता है?

    • A) Yes
    • B) No
    • C) Only for paragraph styles
    • D) Only for character styles
  10. English: What is the base style for all other styles in LibreOffice Writer? Hindi: LibreOffice Writer में सभी अन्य स्टाइल्स के लिए आधार स्टाइल कौन सा है?

    • A) Heading 1
    • B) Text Body
    • C) Default Style
    • D) Title
  11. English: Can you delete a style in LibreOffice Writer? Hindi: क्या आप LibreOffice Writer में किसी स्टाइल को हटा सकते हैं?

    • A) Yes
    • B) No
    • C) Only if it is a custom style
    • D) Only if it is not in use
  12. English: How can you modify an existing style in LibreOffice Writer? Hindi: LibreOffice Writer में किसी मौजूदा स्टाइल को कैसे संशोधित किया जा सकता है?

    • A) By right-clicking and selecting “Modify”
    • B) By double-clicking on it in the Styles and Formatting window
    • C) By using the Format menu
    • D) By using the Edit menu
  13. English: Do page styles in LibreOffice Writer affect headers and footers? Hindi: क्या LibreOffice Writer में पेज स्टाइल्स हेडर और फुटर को प्रभावित करते हैं?

    • A) Yes
    • B) No
    • C) Only headers
    • D) Only footers
  14. English: What does the “Fill Format Mode” allow you to do? Hindi: “फिल फॉर्मेट मोड” आपको क्या करने की अनुमति देता है?

    • A) Apply a style to multiple elements quickly
    • B) Create a new document
    • C) Change the page orientation
    • D) Save the document
  15. English: Can you apply a style to text using keyboard shortcuts in LibreOffice Writer? Hindi: क्या आप कीबोर्ड शॉर्टकट का उपयोग करके LibreOffice Writer में टेक्स्ट पर स्टाइल लागू कर सकते हैं?

    • A) Yes
    • B) No
    • C) Only with extensions
    • D) Only with a special command
  16. English: Which tab is part of the Paragraph Style settings? Hindi: कौन सा टैब पैराग्राफ स्टाइल सेटिंग्स का हिस्सा है?

    • A) Font
    • B) Outline & Numbering
    • C) Borders
    • D) Alignment
  17. English: Can you save custom styles as a template in LibreOffice Writer? Hindi: क्या आप LibreOffice Writer में कस्टम स्टाइल्स को एक टेम्पलेट के रूप में सहेज सकते हैं?

    • A) Yes
    • B) No
    • C) Only if you use an extension
    • D) Only with a special command
  18. English: Are table styles managed separately from paragraph styles in LibreOffice Writer? Hindi: क्या LibreOffice Writer में टेबल स्टाइल्स को पैराग्राफ स्टाइल्स से अलग प्रबंधित किया जाता है?

    • A) Yes
    • B) No
    • C) Only in certain templates
    • D) Only with a special command
  19. English: What does the “Load Styles” function allow you to do? Hindi: “लोड स्टाइल्स” फ़ंक्शन आपको क्या करने की अनुमति देता है?

    • A) Import styles from a template
    • B) Export styles to a template
    • C) Delete styles
    • D) Rename styles
  20. English: Can you access the Styles menu from the main toolbar in LibreOffice Writer? Hindi: क्या आप LibreOffice Writer में मुख्य टूलबार से स्टाइल्स मेनू तक पहुंच सकते हैं?

    • A) Yes
    • B) No
    • C) Only with an extension
    • D) Only with a special command
  21. English: What do paragraph styles control in LibreOffice Writer? Hindi: LibreOffice Writer में पैराग्राफ स्टाइल्स क्या नियंत्रित करते हैं?

    • A) Font color
    • B) Spacing between paragraphs
    • C) Table borders
    • D) Image alignment
  22. English: Can character styles include font color settings? Hindi: क्या कैरेक्टर स्टाइल्स में फॉन्ट कलर सेटिंग्स शामिल हो सकती हैं?

    • A) Yes
    • B) No
    • C) Only with an extension
    • D) Only with a special command
  23. English: What does the “AutoUpdate” feature do when you change a style? Hindi: जब आप किसी स्टाइल को बदलते हैं तो “ऑटो अपडेट” फीचर क्या करता है?

    • A) Updates all instances of the style
    • B) Only updates the current paragraph
    • C) Only updates the current page
    • D) Does not update any instances
  24. English: Can you assign a shortcut key to a style in LibreOffice Writer? Hindi: क्या आप LibreOffice Writer में किसी स्टाइल को शॉर्टकट कुंजी असाइन कर सकते हैं?

    • A) Yes
    • B) No
    • C) Only with an extension
    • D) Only with a special command
  25. English: Can the “Styles and Formatting” window be docked to the side of the screen? Hindi: क्या “स्टाइल्स और फॉर्मेटिंग” विंडो को स्क्रीन के साइड में डॉक किया जा सकता है?

    • A) Yes
    • B) No
    • C) Only with an extension
    • D) Only with a special command
  26. English: Can page styles change the orientation of the page in LibreOffice Writer? Hindi: क्या पेज स्टाइल्स LibreOffice Writer में पेज के ओरिएंटेशन को बदल सकते हैं?

    • A) Yes
    • B) No
    • C) Only with an extension
    • D) Only with a special command
  27. English: What does the “Hierarchical” view show in LibreOffice Writer? Hindi: LibreOffice Writer में “हाइरार्किकल” व्यू क्या दिखाता है?

    • A) Relationship between different styles
    • B) All character styles
    • C) Only paragraph styles
    • D) Only page styles
  28. English: Can you copy a style from one document to another in LibreOffice Writer? Hindi: क्या आप LibreOffice Writer में एक दस्तावेज़ से दूसरे में स्टाइल कॉपी कर सकते हैं?

    • A) Yes
    • B) No
    • C) Only with an extension
    • D) Only with a special command
  29. English: Which of the following can be customized in a paragraph style? Hindi: निम्नलिखित में से कौन पैराग्राफ स्टाइल में कस्टमाइज़ किया जा सकता है?

    • A) Font type
    • B) Line spacing
    • C) Indentation
    • D) All of the above
  30. English: What does the “Reset to Default” option do in the Styles menu? Hindi: स्टाइल्स मेनू में “रीसेट टू डिफ़ॉल्ट” विकल्प क्या करता है?

    • A) Resets the style settings to default
    • B) Deletes the style
    • C) Saves the style
    • D) Copies the style

Answer

  1. C
  2. B
  3. C
  4. B
  5. D
  6. C
  7. B
  8. B
  9. A
  10. C
  11. C
  12. A
  13. A
  14. A
  15. A
  16. B
  17. A
  18. A
  19. A
  20. A
  21. B
  22. A
  23. A
  24. A
  25. A
  26. A
  27. A
  28. A
  29. D
  30. A

दोस्तों, मुझे उम्मीद है कि आपको यह लेख पसंद आएगा और इसे पढ़ने के बाद आपको बहुत सारा ज्ञान मिल जाएगा। अगर आपको पोस्ट पसंद आए तो लाइक और शेयर करें, क्योंकि अच्छी बातें शेयर करनी चाहिए। अगर आपकी कोई जिज्ञासा या इच्छा है तो कृपया मुझे कमेंट में बताएं

How to Use LibreOffice Writer Format Menu in Hindi | LibreOffice Writer Format Menu MCQ Hindi and English / CCC Notes || True false Format menu for ccc exam in Hindi

Format Menu

LibreOffice writer Format menu in Hindi and English

CCC परीक्षा का सिलेबस मे LibreOffice Writer का फार्मेट मेनू एक उपयोगी टूल है जो आपको documents को संपादित (Format) करने के विभिन्न विकल्प प्रदान करता है। यह मेनू विभिन्न विकल्पों के माध्यम से टेक्स्ट (letters) और दस्तावेज़ (files) के अन्य तत्वों को संशोधित /Format करने की सुविधा देता है। आइए इसके मुख्य विकल्पों पर एक नज़र डालते हैं:

Libre Office format Menu

LibreOffice Calc Format Menu in Hindi Full Notes

FORMAT MENU {ALT + O}: Format का अर्थ होता है- “सजावट करना”। किसी टेक्स्ट को खूबसूरत व आकर्षक बनाने के लिए इस मेनू का उपयोग किया जाता है। LibreOffice Calc Format Menu के अंतर्गत बिभिन्न Options दिए गए हैं:

  1. Bold {Ctrl + B}: सेलेक्ट किये गए टेक्स्ट को मोटा करने के लिए उपयोग।

  2. Italic {Ctrl + I}: सेलेक्ट किये गए टेक्स्ट को तिरछा करने के लिए उपयोग।

  3. Underline {Ctrl + U}: सेलेक्ट किये गए टेक्स्ट के नीचे एक लाइन खींचने के लिए उपयोग।

  4. Double Underline: सेलेक्ट किये गए टेक्स्ट के नीचे दो लाइन लगाने के लिए उपयोग।

  5. Strikethrough: सेलेक्ट किये गए टेक्स्ट को बीच से काटने के लिए उपयोग। जैसे- Rs. 25 Rs.20.

  6. Overline: सेलेक्ट किये गए टेक्स्ट के ऊपर एक लाइन लगाने के लिए उपयोग।

  7. Superscript {Ctrl + Shift + P}: सेलेक्ट किये गए टेक्स्ट को बेसलाइन के ऊपर (घात के रूप में) करने के लिए उपयोग। जैसे- (A+B)².

  8. Subscript {Ctrl + Shift + B}: सेलेक्ट किये गए टेक्स्ट को बेसलाइन के नीचे (घात के रूप में) करने के लिए उपयोग। जैसे- C₆H₁₂O₆.

  9. Shadow: सेलेक्ट किये गए टेक्स्ट पर छाया डालने के लिए उपयोग।

  10. Outline: सेलेक्ट किये गए टेक्स्ट की केवल आउटलाइन को देखने के लिए उपयोग।

  11. Wrap Text: एक ही सेल में कई लाइन लिखने के लिए उपयोग।

  12. Uppercase: सेलेक्ट किये गए टेक्स्ट को कैपिटल लेटर में लिखने के लिए उपयोग। जैसे- RAJESH IT INSTITUTE.COM.

  13. Lowercase: सेलेक्ट किये गए टेक्स्ट को स्माल लेटर में लिखने के लिए उपयोग। जैसे- rajeshitinstitute.com.

  14. Cycle Case {Shift + F3}: एक केस से दूसरे केस में बदलने के लिए उपयोग।

  15. Sentence Case: सेलेक्ट किये गए टेक्स्ट को sentence case में बदलने के लिए उपयोग। जैसे- Rajesh IT Institute is an educational website.

  16. Capitalize Every Word: सेलेक्ट किये गए टेक्स्ट के प्रत्येक Word के पहले अक्षर को Capital Letter में बदलने के लिए उपयोग। जैसे- Rajesh IT Institute Is An Educational Website.

  17. Toggle Case: सेलेक्ट किये गए टेक्स्ट के प्रत्येक Word के पहले अक्षर को Small Letter में बदलने के लिए उपयोग। जैसे- rAJESH it iNSTITUTE iS aN eDUCATIONAL wEBSITE.

  18. Spacing: स्पेस सेट करने के लिए उपयोग। इसके अंतर्गत कई विकल्प दिए गए हैं:

    • Line Spacing: दो लाइनों के बीच की दूरी सेट करने के लिए। Ctrl+5 दो लाइनों के बीच की दूरी 1.5 पॉइंट, Ctrl+2 दो लाइनों के बीच की दूरी 2 पॉइंट सेट करता है। Note: By Default Line Spacing 1 होती है।

    • Increase Paragraph Spacing: दो पैराग्राफ के बीच की दूरी बढ़ाने के लिए।

    • Decrease Paragraph Spacing: दो पैराग्राफ के बीच की दूरी घटाने के लिए।

    • Increase Indent: पैराग्राफ को राइट साइड में खिसकाने के लिए।

    • Decrease Indent: पैराग्राफ को लेफ्ट साइड में खिसकाने के लिए।

  19. Align: एलाइन्मेंट सेट करने के लिए उपयोग। इसके अंतर्गत कई विकल्प दिए गए हैं:

    • Left {Ctrl + L}: सेलेक्ट किये गए टेक्स्ट को लेफ्ट साइड में एलाइं करने के लिए।

    • Centered {Ctrl + E}: सेलेक्ट किये गए टेक्स्ट को बीच में करने के लिए।

    • Right {Ctrl + R}: सेलेक्ट किये गए टेक्स्ट को राइट साइड में एलाइं करने के लिए।

    • Justified {Ctrl + J}: पैराग्राफ को दोनों ओर (लेफ्ट + राइट) से बराबर करने के लिए।

    • Top: किसी ऑब्जेक्ट को एंकर पॉइंट के ऊपर सेट करने के लिए।

    • Center: किसी ऑब्जेक्ट को एंकर पॉइंट के बीच में सेट करने के लिए।

    • Bottom: किसी ऑब्जेक्ट को एंकर पॉइंट के नीचे सेट करने के लिए।

  20. Number Format: किसी सेल में एंटर किये गए नंबर की फॉर्मेटिंग करने के लिए उपयोग।

  21. Clone Formatting: किसी सेल की फॉर्मेटिंग को कॉपी करके किसी दूसरी सेल पर अप्लाई करने के लिए उपयोग। यह MS Word के Format Painter की तरह कार्य करता है।

  22. Clear Direct Formatting {Ctrl + M}: किसी सेल की फॉर्मेटिंग को समाप्त करने के लिए उपयोग।

  23. Cells {Ctrl+1}: एक्टिव सेल्स की फॉर्मेटिंग करने के लिए। इस विकल्प पर क्लिक करने पर Format Cells नामक एक डायलॉग बॉक्स ओपन होता है, जिसमें सेल्स को फॉर्मेट करने के बिभिन्न विकल्प होते हैं: जैसे – Numbers, Font, Font Effect, Alignment, Border, Background आदि।

  24. Rows: रो की फॉर्मेटिंग करने के लिए उपयोग। इसमें कई विकल्प होते हैं।

  25. Columns: कॉलम की फॉर्मेटिंग करने के लिए उपयोग। इसमें कई विकल्प होते हैं।

  26. Merge Cells: दो या दो से अधिक सेल्स को सेलेक्ट करके उन्हें एक में मिलाने के लिए उपयोग।

  27. Character: इस विकल्प पर क्लिक करने पर Character नामक एक डायलॉग बॉक्स ओपन होता है, जिसमें फ़ॉन्ट, फ़ॉन्ट साइज़ और फ़ॉन्ट स्टाइल को सेट किया जा सकता है।

  28. Paragraph: पैराग्राफ की सेटिंग करने के लिए। जैसे- Indent, Spacing, Alignment, Tab, Drop Cap आदि।

  29. Page: पेज की सेटिंग जैसे- पेज साइज, ओरिएंटेशन, हैडर और फुटर सेट करने के लिए उपयोग।

  30. Print Ranges: सेलेक्ट किये गए सेल रेंज को प्रिंट करने के लिए.

  31. Print Ranges: सेलेक्ट किये गए सेल रेंज को प्रिंट करने के लिए उपयोग। इसमें कई विकल्प होते हैं।

  32. Conditional: किसी कंडीशन के आधार पर सेल की फॉर्मेटिंग करने के लिए उपयोग। इसमें कई विकल्प होते हैं।

  33. Auto Format Styles: सेल को फॉर्मेट करने के विभिन्न स्टाइल्स पहले से ही दिए होते हैं, जिन्हें सेलेक्ट करके सेल को फॉर्मेट किया जा सकता है।

  34. Spreadsheet Theme: स्प्रेडशीट पर विभिन्न प्रकार के थीम अप्लाई करने के लिए उपयोग।

  35. Image: इमेज की सेटिंग करने के लिए। इसमें कई विकल्प होते हैं।

  36. Chart: Insert मेनू के द्वारा बनाए गए चार्ट को इमेज के रूप में कन्वर्ट करने के लिए उपयोग।

  37. Object: किसी ऑब्जेक्ट यानी इमेज की सेटिंग करने के लिए उपयोग।

  38. Name: सेलेक्ट किए गए ऑब्जेक्ट का नामकरण करने के लिए उपयोग।

  39. Description: सेलेक्ट किए गए ऑब्जेक्ट के बारे में कुछ लिखने के लिए उपयोग।

  40. Anchor: किसी ऑब्जेक्ट की स्थिति सेट करने के लिए उपयोग।

  41. Arrange: दो ऑब्जेक्ट को व्यवस्थित करने के लिए उपयोग।

  42. Flip: सेलेक्ट किए गए ऑब्जेक्ट की स्थिति बदलने के लिए उपयोग।

Short Key of Libreoffice writer format menu:

Here are the shortcut keys for the Format menu and its submenus in LibreOffice Writer, listed in both Hindi and English:

  1. Bold (बोल्ड): Ctrl + B
  2. Italic (इटैलिक): Ctrl + I
  3. Underline (रेखांकित): Ctrl + U
  4. Strikethrough (स्ट्राइकथ्रू): Alt + Shift + 5
  5. Superscript (सुपरस्क्रिप्ट): Ctrl + Shift + P
  6. Subscript (सबस्क्रिप्ट): Ctrl + Shift + B
  7. Increase Font Size (फ़ॉन्ट आकार बढ़ाएँ): Ctrl + ]
  8. Decrease Font Size (फ़ॉन्ट आकार घटाएँ): Ctrl + [
  9. Align Left (बाएँ संरेखित करें): Ctrl + L
  10. Align Center (केंद्र संरेखित करें): Ctrl + E
  11. Align Right (दाएँ संरेखित करें): Ctrl + R
  12. Justify (समानांतर करें): Ctrl + J
  13. Bullets On/Off (बुलेट्स चालू/बंद): Shift + F12
  14. Numbering On/Off (क्रमांक चालू/बंद): F12
  15. Increase Paragraph Spacing (पैराग्राफ़ स्पेसिंग बढ़ाएँ): Ctrl + 0
  16. Decrease Paragraph Spacing (पैराग्राफ़ स्पेसिंग घटाएँ): Ctrl + 1

These shortcuts can help you quickly format your text in LibreOffice Writer. If you need more details or additional shortcuts, feel free to ask!

Most Important True and False Question with Answer of Libre Office writer Format Menu

  1. LibreOffice Writer में “Format” मेनू का उपयोग डॉक्यूमेंट में फॉर्मेटिंग के लिए किया जाता है।

    • True
    • False
  2. “Bold” विकल्प का उपयोग टेक्स्ट को मोटा करने के लिए किया जाता है।

    • True
    • False
  3. “Italic” विकल्प का उपयोग टेक्स्ट को तिरछा करने के लिए नहीं किया जाता है।

    • True
    • False
  4. “Underline” विकल्प का शॉर्टकट की Ctrl + U है।

    • True
    • False
  5. “Strikethrough” का उपयोग टेक्स्ट को बीच से काटने के लिए किया जाता है।

    • True
    • False
  6. “Superscript” विकल्प का शॉर्टकट की Ctrl + Shift + P है।

    • True
    • False
  7. “Subscript” विकल्प का शॉर्टकट की Ctrl + Shift + B है।

    • True
    • False
  8. “Format” मेनू में “Paragraph” विकल्प का उपयोग पैराग्राफ की फॉर्मेटिंग के लिए किया जाता है।

    • True
    • False
  9. “Align Left” का शॉर्टकट की Ctrl + L है।

    • True
    • False
  10. “Align Right” का शॉर्टकट की Ctrl + R है।

    • True
    • False
  11. “Center Align” का शॉर्टकट की Ctrl + E है।

    • True
    • False
  12. “Justify” का शॉर्टकट की Ctrl + J है।

    • True
    • False
  13. “Increase Indent” विकल्प का उपयोग टेक्स्ट को बाईं ओर खिसकाने के लिए किया जाता है।

    • True
    • False
  14. “Decrease Indent” विकल्प का उपयोग टेक्स्ट को दाईं ओर खिसकाने के लिए किया जाता है।

    • True
    • False
  15. “Clear Direct Formatting” का शॉर्टकट की Ctrl + M है।

    • True
    • False
  16. “Format” मेनू में “Bullets and Numbering” विकल्प उपलब्ध नहीं है।

    • True
    • False
  17. “Character” विकल्प का उपयोग टेक्स्ट के फॉन्ट, स्टाइल, और साइज को बदलने के लिए किया जाता है।

    • True
    • False
  18. “Background” विकल्प का उपयोग पेज बैकग्राउंड रंग बदलने के लिए किया जाता है।

    • True
    • False
  19. “Borders” विकल्प का उपयोग टेक्स्ट बॉक्स के चारों ओर बॉर्डर जोड़ने के लिए किया जाता है।

    • True
    • False
  20. “Wrap Text” का उपयोग एक ही सेल में कई लाइनों में टेक्स्ट लिखने के लिए किया जाता है।

    • True
    • False
  21. “Columns” विकल्प का उपयोग टेक्स्ट को कॉलम में विभाजित करने के लिए किया जाता है।

    • True
    • False
  22. “Rotate” विकल्प का उपयोग टेक्स्ट को घुमाने के लिए किया जाता है।

    • True
    • False
  23. “Protect Cell” विकल्प का उपयोग सेल को लॉक करने के लिए किया जाता है।

    • True
    • False
  24. “Merge Cells” का शॉर्टकट की Ctrl + Shift + M है।

    • True
    • False
  25. “Shrink to Fit” विकल्प का उपयोग टेक्स्ट को सेल में फिट करने के लिए किया जाता है।

    • True
    • False
  26. “Text Direction” विकल्प का उपयोग टेक्स्ट के दिशा को बदलने के लिए किया जाता है।

    • True
    • False
  27. “Change Case” विकल्प का उपयोग टेक्स्ट के कैपिटलाइजेशन को बदलने के लिए किया जाता है।

    • True
    • False
  28. “Increase Font Size” का शॉर्टकट की Ctrl + ] है।

    • True
    • False
  29. “Decrease Font Size” का शॉर्टकट की Ctrl + [ है।

    • True
    • False
  30. “Format” मेनू में “Page Style” विकल्प उपलब्ध नहीं है।

    • True
    • False

Answer

  1. True
  2. True
  3. False
  4. True
  5. True
  6. True
  7. True
  8. True
  9. True
  10. True
  11. True
  12. True
  13. False
  14. False
  15. True
  16. False
  17. True
  18. True
  19. True
  20. True
  21. True
  22. True
  23. True
  24. False
  25. True
  26. True
  27. True
  28. True
  29. True
  30. False

Most Important MCQ of LibreOffice of format Menu In Hindi

  1. LibreOffice Writer में टेक्स्ट को बोल्ड करने के लिए कौन सा शॉर्टकट कुंजी है?

    • A) Ctrl + B
    • B) Ctrl + I
    • C) Ctrl + U
    • D) Ctrl + E
  2. LibreOffice Writer में टेक्स्ट को इटैलिक करने के लिए कौन सा शॉर्टकट कुंजी है?

    • A) Ctrl + B
    • B) Ctrl + I
    • C) Ctrl + U
    • D) Ctrl + E
  3. LibreOffice Writer में टेक्स्ट को अंडरलाइन करने के लिए कौन सा शॉर्टकट कुंजी है?

    • A) Ctrl + B
    • B) Ctrl + I
    • C) Ctrl + U
    • D) Ctrl + E
  4. LibreOffice Writer में सभी कैरेक्टर को अपरकेस में बदलने के लिए कौन सा विकल्प है?

    • A) Lowercase
    • B) Capitalize Every Word
    • C) Uppercase
    • D) Sentence Case
  5. LibreOffice Writer में टेक्स्ट को तिरछा करने के लिए कौन सा शॉर्टकट कुंजी है?

    • A) Ctrl + B
    • B) Ctrl + I
    • C) Ctrl + U
    • D) Ctrl + E
  6. LibreOffice Writer में टेक्स्ट को बीच में संरेखित करने के लिए कौन सा शॉर्टकट कुंजी है?

    • A) Ctrl + L
    • B) Ctrl + E
    • C) Ctrl + R
    • D) Ctrl + J
  7. LibreOffice Writer में टेक्स्ट को बायां संरेखित करने के लिए कौन सा शॉर्टकट कुंजी है?

    • A) Ctrl + L
    • B) Ctrl + E
    • C) Ctrl + R
    • D) Ctrl + J
  8. LibreOffice Writer में टेक्स्ट को दायां संरेखित करने के लिए कौन सा शॉर्टकट कुंजी है?

    • A) Ctrl + L
    • B) Ctrl + E
    • C) Ctrl + R
    • D) Ctrl + J
  9. LibreOffice Writer में टेक्स्ट को दोनों ओर से संरेखित करने के लिए कौन सा शॉर्टकट कुंजी है?

    • A) Ctrl + L
    • B) Ctrl + E
    • C) Ctrl + R
    • D) Ctrl + J
  10. LibreOffice Writer में टेक्स्ट की लाइन स्पेसिंग को 1.5 करने के लिए कौन सा शॉर्टकट कुंजी है?

    • A) Ctrl + 1
    • B) Ctrl + 5
    • C) Ctrl + 2
    • D) Ctrl + 3
  11. LibreOffice Writer में टेक्स्ट की लाइन स्पेसिंग को डबल करने के लिए कौन सा शॉर्टकट कुंजी है?

    • A) Ctrl + 1
    • B) Ctrl + 5
    • C) Ctrl + 2
    • D) Ctrl + 3
  12. LibreOffice Writer में टेक्स्ट को अपरकेस में बदलने के लिए कौन सा शॉर्टकट कुंजी है?

    • A) Ctrl + Shift + U
    • B) Ctrl + Shift + L
    • C) Ctrl + Shift + C
    • D) Ctrl + Shift + K
  13. LibreOffice Writer में टेक्स्ट को लोअरकेस में बदलने के लिए कौन सा शॉर्टकट कुंजी है?

    • A) Ctrl + Shift + U
    • B) Ctrl + Shift + L
    • C) Ctrl + Shift + C
    • D) Ctrl + Shift + K
  14. LibreOffice Writer में ड्रॉप कैप जोड़ने के लिए कौन सा विकल्प है?

    • A) Paragraph…
    • B) Text…
    • C) Drop Caps…
    • D) Columns…
  15. LibreOffice Writer में पेज मार्जिन को बदलने के लिए कौन सा मेनू है?

    • A) Insert
    • B) Format
    • C) View
    • D) Tools
  16. LibreOffice Writer में फॉन्ट साइज को बदलने के लिए कौन सा विकल्प है?

    • A) Font…
    • B) Character…
    • C) Paragraph…
    • D) Text…
  17. LibreOffice Writer में पैराग्राफ स्पेसिंग को बढ़ाने के लिए कौन सा शॉर्टकट कुंजी है?

    • A) Ctrl + 1
    • B) Ctrl + 2
    • C) Ctrl + 0
    • D) Ctrl + M
  18. LibreOffice Writer में फॉन्ट को बदलने के लिए कौन सा मेनू है?

    • A) Insert
    • B) Format
    • C) View
    • D) Tools
  19. LibreOffice Writer में टेक्स्ट को हाइलाइट करने के लिए कौन सा विकल्प है?

    • A) Highlight Color
    • B) Background Color
    • C) Text Color
    • D) Font Color
  20. LibreOffice Writer में पैराग्राफ को बढ़ाने के लिए कौन सा शॉर्टकट कुंजी है?

    • A) Ctrl + 1
    • B) Ctrl + 2
    • C) Ctrl + 0
    • D) Ctrl + M
  21. LibreOffice Writer में बुलेट्स जोड़ने के लिए कौन सा विकल्प है?

    • A) Insert
    • B) Format
    • C) Tools
    • D) Bullets and Numbering
  22. LibreOffice Writer में टेक्स्ट के नीचे लाइन खींचने के लिए कौन सा शॉर्टकट कुंजी है?

    • A) Ctrl + B
    • B) Ctrl + I
    • C) Ctrl + U
    • D) Ctrl + E
  23. LibreOffice Writer में पेज ब्रेक जोड़ने के लिए कौन सा मेनू है?

    • A) Insert
    • B) Format
    • C) View
    • D) Tools
  24. LibreOffice Writer में टेक्स्ट की लाइन स्पेसिंग को 2.0 करने के लिए कौन सा शॉर्टकट कुंजी है?

    • A) Ctrl + 1
    • B) Ctrl + 2
    • C) Ctrl + 5
    • D) Ctrl + 3
  25. LibreOffice Writer में टेक्स्ट को अंडरलाइन करने के लिए कौन सा शॉर्टकट कुंजी है?

    • A) Ctrl + B
    • B) Ctrl + I
    • C) Ctrl + U
    • D) Ctrl + E
  26. LibreOffice Writer में टेक्स्ट की लाइन स्पेसिंग को 1.0 करने के लिए कौन सा शॉर्टकट कुंजी है?

    • A) Ctrl + 1
    • B) Ctrl + 5
    • C) Ctrl + 2
    • D) Ctrl + 3
  27. LibreOffice Writer में टेक्स्ट को मोटा करने के लिए कौन सा शॉर्टकट कुंजी है?

    • A) Ctrl + B
    • B) Ctrl + I
    • C) Ctrl + U
    • D) Ctrl + E
  28. LibreOffice Writer में पैराग्राफ को दाहिने संरेखित करने के लिए कौन सा शॉर्टकट कुंजी है?

    • A) Ctrl + L
    • B) Ctrl + E
    • C) Ctrl + R
    • D) Ctrl + J
  29. LibreOffice Writer में पैराग्राफ को बाएँ संरेखित करने के लिए कौन सा शॉर्टकट कुंजी है?

    • A) Ctrl + L
    • B) Ctrl + E
    • C) Ctrl + R
    • D) Ctrl + J
  30. LibreOffice Writer में पैराग्राफ को बीच में संरेखित करने के लिए कौन सा शॉर्टकट कुंजी है?

    • A) Ctrl + L
    • B) Ctrl + E
    • C) Ctrl + R
    • D) Ctrl + J

Answer

  1. A) Ctrl + B
  2. B) Ctrl + I
  3. C) Ctrl + U
  4. C) Uppercase
  5. B) Ctrl + I
  6. B) Ctrl + E
  7. A) Ctrl + L
  8. C) Ctrl + R
  9. D) Ctrl + J
  10. B) Ctrl + 5
  11. C) Ctrl + 2
  12. A) Ctrl + Shift + U
  13. B) Ctrl + Shift + L
  14. C) Drop Caps…
  15. B) Format
  16. B) Character…
  17. D) Ctrl + M
  18. B) Format
  19. A) Highlight Color
  20. D) Ctrl + M
  21. D) Bullets and Numbering
  22. C) Ctrl + U
  23. A) Insert
  24. B) Ctrl + 2
  25. C) Ctrl + U
  26. A) Ctrl + 1
  27. A) Ctrl + B
  28. C) Ctrl + R
  29. A) Ctrl + L
  30. B) Ctrl + E