LibreOffice Impress Format Menu क्या है?
LibreOffice Impress Format Menu आपके प्रेजेंटेशन को सुंदर और पेशेवर बनाने के लिए कई उपयोगी टूल्स प्रदान करता है। इस मेनू से आप आसानी से टेक्स्ट को Bold और Italic कर सकते हैं, उसकी Line Spacing और Alignment को सेट कर सकते हैं, और यहां तक कि Images और Shapes को भी फॉर्मेट कर सकते हैं। जैसे, आप इमेज को Crop कर सकते हैं, घुमा सकते हैं, या उसकी Size और Position को बदल सकते हैं। LibreOffice Impress Format Menu में आपको Group, Align, और Arrange जैसे विकल्प मिलते हैं, जिनसे आप अपने ऑब्जेक्ट्स को व्यवस्थित कर सकते हैं। इस पोस्ट में, हमने LibreOffice Impress Format Menu को समझने के साथ-साथ कंप्यूटर एग्जाम के लिए महत्वपूर्ण MCQ, True/False, FAQ, और शॉर्टकट कीज भी सीखे गे, जो आपकी परीक्षा की तैयारी के लिए बेहद फायदेमंद साबित होंगी।
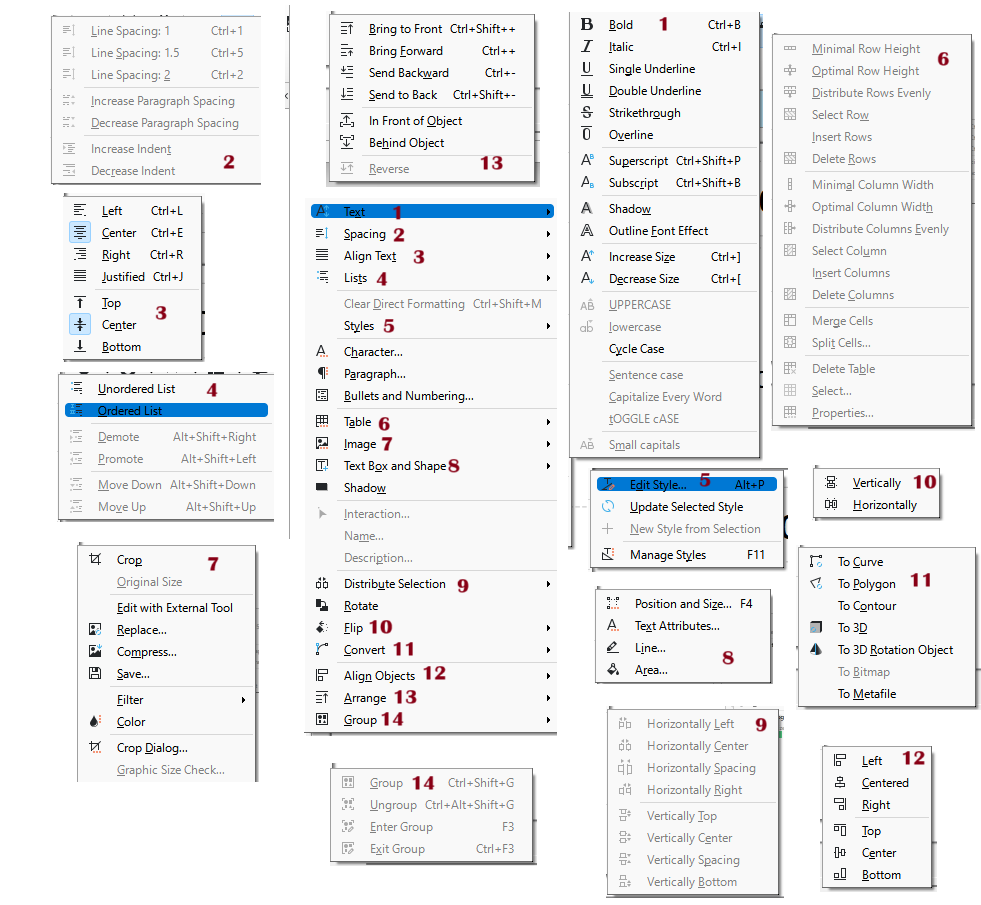
1. Text (टेक्स्ट)
Text मेनू का उपयोग टेक्स्ट को फॉर्मेट करने के लिए किया जाता है। Bold (Ctrl+B) का उपयोग टेक्स्ट को गाढ़ा (बोल्ड) करने के लिए किया जाता है। Italic (Ctrl+I) से टेक्स्ट को तिरछा (इटैलिक) किया जा सकता है। Underline और Double Underline टेक्स्ट के नीचे एक या दो लाइन खींचने के लिए होते हैं। अगर आपको टेक्स्ट में कुछ काटकर दिखाना हो, तो Strikethrough का उपयोग किया जाता है।
Superscript (Ctrl+Shift+P) और Subscript (Ctrl+Shift+B) का उपयोग गणितीय या वैज्ञानिक टेक्स्ट लिखने के लिए किया जाता है, जैसे कि संख्याओं के ऊपर या नीचे छोटे अक्षर या अंक लिखने के लिए। Shadow और Outline Font Effect का उपयोग टेक्स्ट में विशेष प्रभाव जोड़ने के लिए किया जाता है।
Increase Size (Ctrl+]) और Decrease Size (Ctrl+[) के माध्यम से आप टेक्स्ट का आकार बड़ा या छोटा कर सकते हैं। UPPERCASE, lowercase, Cycle Case, और Sentence case का उपयोग अक्षरों की स्थिति को बदलने के लिए किया जाता है, जैसे कि सभी अक्षर बड़े या छोटे में बदलना। Capitalize Every Word और TOGGLE CASE भी विशेष फॉर्मेटिंग के लिए उपयोगी होते हैं।
2. Spacing (स्पेसिंग)
Spacing मेनू का उपयोग लाइनों और पैराग्राफ के बीच की दूरी को नियंत्रित करने के लिए किया जाता है। इसमें निम्नलिखित विकल्प शामिल हैं:
- Line Spacing: 1 (Ctrl+1) – यह विकल्प लाइन स्पेसिंग को 1 सेट करता है।
- Line Spacing: 1.5 (Ctrl+5) – इससे लाइन स्पेसिंग 1.5 हो जाती है।
- Line Spacing: 2 (Ctrl+2) – लाइन स्पेसिंग को 2 करने के लिए।
- Increase Paragraph Spacing – पैराग्राफ के बीच की दूरी को बढ़ाने के लिए।
- Decrease Paragraph Spacing – पैराग्राफ के बीच की दूरी को कम करने के लिए।
- Increase Indent – टेक्स्ट को दाईं ओर खिसकाने के लिए।
- Decrease Indent – टेक्स्ट को बाईं ओर खिसकाने के लिए।
3. Align Text (टेक्स्ट को संरेखित करें)
Align Text मेनू का उपयोग टेक्स्ट के संरेखण को नियंत्रित करने के लिए किया जाता है। इसमें निम्नलिखित विकल्प होते हैं:
- Left (Ctrl+L) – टेक्स्ट को बाईं ओर संरेखित करने के लिए।
- Center (Ctrl+E) – टेक्स्ट को केंद्र में संरेखित करने के लिए।
- Right (Ctrl+R) – टेक्स्ट को दाईं ओर संरेखित करने के लिए।
- Justified (Ctrl+J) – टेक्स्ट को दोनों किनारों पर समान रूप से संरेखित करने के लिए।
- Top – टेक्स्ट को ऊपर की ओर संरेखित करने के लिए।
- Center – टेक्स्ट को ऊर्ध्वाधर (वर्टिकल) रूप से केंद्र में संरेखित करने के लिए।
- Bottom – टेक्स्ट को नीचे की ओर संरेखित करने के लिए।
4. Lists (सूचियां)
Lists मेनू का उपयोग बुलेटेड या नंबर की गई सूचियां बनाने के लिए किया जाता है। इसमें निम्नलिखित विकल्प होते हैं:
- Unordered List – बिना क्रम के बुलेटेड सूची बनाने के लिए।
- Ordered List – क्रमबद्ध (नंबर वाली) सूची बनाने के लिए।
- Demote (Alt+Shift+Right) – सूची के आइटम को एक स्तर नीचे करने के लिए।
- Promote (Alt+Shift+Left) – सूची के आइटम को एक स्तर ऊपर करने के लिए।
- Move Down (Alt+Shift+Down) – सूची के आइटम को नीचे ले जाने के लिए।
- Move Up (Alt+Shift+Up) – सूची के आइटम को ऊपर ले जाने के लिए।
5. Styles (शैलियाँ)
Styles मेनू का उपयोग विभिन्न प्रकार की फॉर्मेटिंग शैलियों को लागू करने के लिए किया जाता है। इसमें शामिल हैं:
- Clear Direct Formatting (Ctrl+Shift+M) – किसी भी सीधे लागू की गई फॉर्मेटिंग को हटाने के लिए।
- Character – पात्र (करैक्टर) से संबंधित फॉर्मेटिंग के विकल्प।
- Paragraph – पैराग्राफ से संबंधित फॉर्मेटिंग के विकल्प।
- Bullets and Numbering – बुलेट्स और नंबरिंग से संबंधित विकल्प।
- Table – टेबल से संबंधित फॉर्मेटिंग।
- Image – छवि से संबंधित फॉर्मेटिंग विकल्प।
- Text Box and Shape – टेक्स्ट बॉक्स और आकृति से संबंधित फॉर्मेटिंग।
- Shadow – टेक्स्ट या ऑब्जेक्ट के लिए छाया प्रभाव जोड़ने के लिए।
- Outline Font Effect – टेक्स्ट के लिए बाहरी रेखा प्रभाव जोड़ने के लिए।
6. Table Formatting (टेबल फॉर्मेटिंग)
Table Formatting मेनू का उपयोग टेबल को फॉर्मेट करने के लिए किया जाता है। इसमें निम्नलिखित विकल्प होते हैं:
- Minimal Row Height – न्यूनतम पंक्ति ऊंचाई सेट करने के लिए।
- Optimal Row Height – सर्वश्रेष्ठ पंक्ति ऊंचाई सेट करने के लिए।
- Distribute Rows Evenly – सभी पंक्तियों की ऊंचाई को समान रूप से सेट करने के लिए।
- Select Row – एक पूरी पंक्ति का चयन करने के लिए।
- Insert Rows – नई पंक्तियाँ जोड़ने के लिए।
- Delete Rows – मौजूदा पंक्तियों को हटाने के लिए।
- Minimal Column Width – न्यूनतम कॉलम चौड़ाई सेट करने के लिए।
- Optimal Column Width – सर्वश्रेष्ठ कॉलम चौड़ाई सेट करने के लिए।
- Distribute Columns Evenly – सभी कॉलम की चौड़ाई को समान रूप से सेट करने के लिए।
- Select Column – एक पूरा कॉलम चुनने के लिए।
- Insert Columns – नए कॉलम जोड़ने के लिए।
- Delete Columns – मौजूदा कॉलम हटाने के लिए।
- Merge Cells – कई सेल को एक सेल में मिलाने के लिए।
- Split Cells – एक सेल को कई सेल में विभाजित करने के लिए।
- Delete Table – पूरी टेबल हटाने के लिए।
- Select – टेबल का चयन करने के लिए।
- Properties – टेबल की गुणधर्म (प्रॉपर्टीज) सेट करने के लिए।
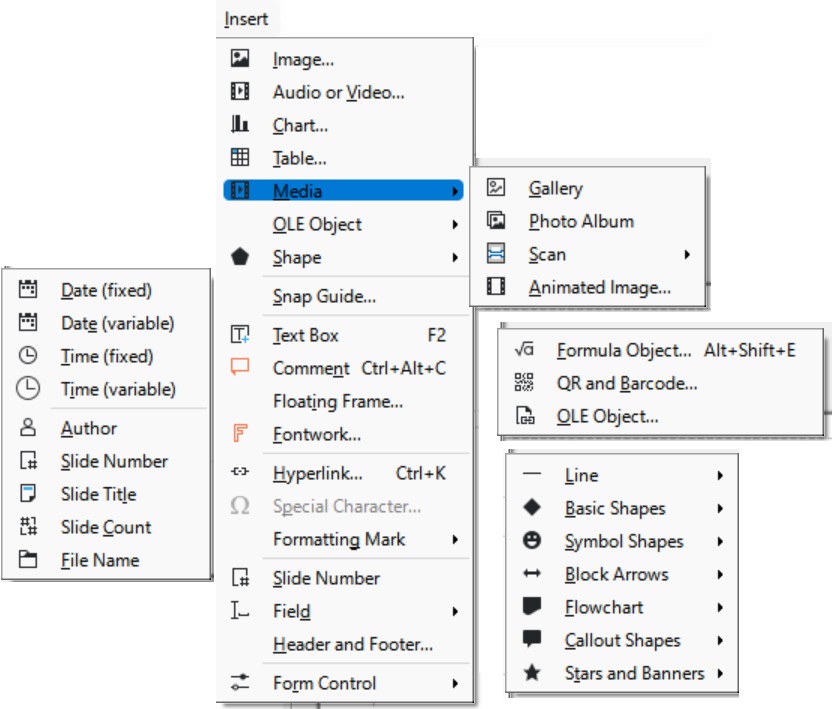
7. Image Operations (छवि संचालन)
Image Operations मेनू का उपयोग छवियों के साथ विभिन्न ऑपरेशन करने के लिए किया जाता है। इसमें निम्नलिखित विकल्प होते हैं:
- Crop – छवि को क्रॉप करने के लिए।
- Original Size – छवि को उसकी मूल आकार में पुनर्स्थापित करने के लिए।
- Edit with External Tool – बाहरी टूल के साथ छवि को संपादित करने के लिए।
- Replace – मौजूदा छवि को बदलने के लिए।
- Compress – छवि को संकुचित करने के लिए।
- Save – छवि को सहेजने के लिए।
- Filter – छवि पर फ़िल्टर लगाने के लिए।
- Color – छवि के रंग को समायोजित करने के लिए।
- Crop Dialog – क्रॉप करने के लिए संवाद बॉक्स खोलने के लिए।
- Graphic Size Check – ग्राफ़िक का आकार जांचने के लिए।
8. Text Box and Shape (टेक्स्ट बॉक्स और आकृति)
Text Box and Shape मेनू का उपयोग टेक्स्ट बॉक्स और आकृतियों को फॉर्मेट करने के लिए किया जाता है। इसमें निम्नलिखित विकल्प होते हैं:
- Position and Size (F4) – टेक्स्ट बॉक्स या आकृति की स्थिति और आकार सेट करने के लिए।
- Text Attributes – टेक्स्ट की विशेषताओं को सेट करने के लिए।
- Line – लाइन से संबंधित फॉर्मेटिंग विकल्प।
- Area – क्षेत्र से संबंधित फॉर्मेटिंग विकल्प।
Interaction – यह मेनू इंटरएक्टिव फीचर्स सेट करने के लिए होता है, जैसे कि ऑब्जेक्ट पर क्लिक करने पर क्या होगा।
Name – ऑब्जेक्ट्स का नाम सेट करने के लिए।
Description – ऑब्जेक्ट्स का वर्णन जोड़ने के लिए।
9. Distribute Selection (चयन वितरित करें)
Distribute Selection मेनू का उपयोग चयनित ऑब्जेक्ट्स को समान दूरी पर व्यवस्थित करने के लिए किया जाता है। इसमें शामिल हैं:
- Horizontally – क्षैतिज रूप से समान दूरी पर सेट करने के लिए।
- Vertically – ऊर्ध्वाधर रूप से समान दूरी पर सेट करने के लिए।
10. Rotate (घुमाएं)
Rotate मेनू का उपयोग ऑब्जेक्ट्स को घुमाने के लिए किया जाता है। इसमें निम्नलिखित विकल्प शामिल हैं:
- Flip Vertically – ऑब्जेक्ट को ऊर्ध्वाधर रूप से पलटने के लिए।
- Flip Horizontally – ऑब्जेक्ट को क्षैतिज रूप से पलटने के लिए।
11. Convert (रूपांतर करें)
Convert मेनू का उपयोग ऑब्जेक्ट्स के प्रारूप को बदलने के लिए किया जाता है। इसमें शामिल हैं:
- To Curve – ऑब्जेक्ट को कर्व (वक्र) में बदलने के लिए।
- To Polygon – ऑब्जेक्ट को बहुभुज (पॉलीगॉन) में बदलने के लिए।
- To Contour – ऑब्जेक्ट को कंकाल रूप में बदलने के लिए।
- To 3D – ऑब्जेक्ट को त्रिआयामी (3D) रूप में बदलने के लिए।
- To 3D Rotation Object – ऑब्जेक्ट को 3D रोटेशन ऑब्जेक्ट में बदलने के लिए।
- To Bitmap – ऑब्जेक्ट को बिटमैप में बदलने के लिए।
- To Metafile – ऑब्जेक्ट को मेटाफाइल में बदलने के लिए।
12. Align Objects (ऑब्जेक्ट्स को संरेखित करें)
Align Objects मेनू का उपयोग विभिन्न ऑब्जेक्ट्स को संरेखित (अलाइन) करने के लिए किया जाता है। इसमें शामिल हैं:
- Left – ऑब्जेक्ट्स को बाईं ओर संरेखित करने के लिए।
- Centered – ऑब्जेक्ट्स को केंद्र में संरेखित करने के लिए।
- Right – ऑब्जेक्ट्स को दाईं ओर संरेखित करने के लिए।
- Top – ऑब्जेक्ट्स को ऊपर संरेखित करने के लिए।
- Center – ऑब्जेक्ट्स को ऊर्ध्वाधर रूप से केंद्र में संरेखित करने के लिए।
- Bottom – ऑब्जेक्ट्स को नीचे संरेखित करने के लिए।
13. Arrange (व्यवस्थित करें)
Arrange मेनू का उपयोग ऑब्जेक्ट्स की परतों को प्रबंधित करने के लिए किया जाता है। इससे आप ऑब्जेक्ट्स को आगे या पीछे ले जा सकते हैं। इसमें निम्नलिखित विकल्प शामिल हैं:
- Bring to Front (Ctrl+Shift+Up Arrow) – ऑब्जेक्ट को सबसे आगे लाने के लिए।
- Bring Forward (Ctrl+]) – ऑब्जेक्ट को एक परत आगे लाने के लिए।
- Send Backward (Ctrl+[) – ऑब्जेक्ट को एक परत पीछे भेजने के लिए।
- Send to Back (Ctrl+Shift+Down Arrow) – ऑब्जेक्ट को सबसे पीछे भेजने के लिए।
- In Front of Object – ऑब्जेक्ट को किसी अन्य ऑब्जेक्ट के आगे लाने के लिए।
- Behind Object – ऑब्जेक्ट को किसी अन्य ऑब्जेक्ट के पीछे ले जाने के लिए।
- Reverse – ऑब्जेक्ट्स की स्थिति को उलटने के लिए।
14. Group (समूहित करें)
Group मेनू का उपयोग एक से अधिक ऑब्जेक्ट्स को समूहित (ग्रुप) करने के लिए किया जाता है, जिससे उन्हें एक इकाई के रूप में नियंत्रित किया जा सके। इसमें शामिल हैं:
- Group (Ctrl+G) – चयनित ऑब्जेक्ट्स को समूहित करने के लिए।
- Ungroup (Ctrl+Alt+Shift+G) – समूह को अलग करने के लिए।
- Enter Group (F3) – समूह के अंदर जाने के लिए, जिससे आप व्यक्तिगत ऑब्जेक्ट्स को संपादित कर सकें।
- Exit Group (Ctrl+F3) – समूह से बाहर निकलने के लिए।
LibreOffice Impress Format Menu MCQ in Hindi for CCC , O Level and Competitive Exam:
- LibreOffice Impress में कौन-सा मेनू Line Spacing को adjust करने की अनुमति देता है?
- (A) Text
- (B) Line Spacing
- (C) Alignment
- (D) Crop
- Format मेनू में Alignment के ‘Justified’ विकल्प का क्या कार्य है?
- (A) Text को left align करना
- (B) Text को right align करना
- (C) Text को left और right margins के बीच evenly align करना
- (D) Text को center align करना
- LibreOffice Impress में कौन-सा विकल्प ‘Update Selected Style’ की सुविधा देता है?
- (A) Edit Style
- (B) Text Box and Shape
- (C) Distribute Selection
- (D) Convert
- LibreOffice Impress में text को ‘Bold’ बनाने का शॉर्टकट क्या है?
- (A) Ctrl+I
- (B) Ctrl+B
- (C) Ctrl+U
- (D) Ctrl+E
- Format मेनू में कौन-सा feature ‘Distribute Rows Evenly’ की सुविधा देता है?
- (A) Row and Column Management
- (B) Arrange
- (C) Align Objects
- (D) Lists
- ‘Crop’ sub-menu में कौन-सा विकल्प image को original size में restore करने की अनुमति देता है?
- (A) Original Size
- (B) Compress
- (C) Save
- (D) Filter
- ‘Alignment’ मेनू में ‘Center’ विकल्प क्या करता है?
- (A) Text को horizontally center align करता है
- (B) Text को vertically center align करता है
- (C) Text को left align करता है
- (D) Text को right align करता है
- ‘Text Box and Shape’ मेनू में ‘Position and Size’ का मुख्य कार्य क्या है?
- (A) Text को Bold करना
- (B) Object की position और size adjust करना
- (C) List का format बदलना
- (D) Image को crop करना
- LibreOffice Impress में ‘Rotate’ विकल्प का उपयोग किसके लिए किया जाता है?
- (A) Text को rotate करने के लिए
- (B) Image को rotate करने के लिए
- (C) Shape को rotate करने के लिए
- (D) उपरोक्त सभी
- ‘Lists’ मेनू में ‘Ordered List’ का कार्य क्या है?
- (A) Numbered list बनाना
- (B) Bulleted list बनाना
- (C) List को demote करना
- (D) List को promote करना
- ‘Table’ sub-menu में ‘Insert Column’ का क्या कार्य है?
- (A) नई row insert करना
- (B) Column को delete करना
- (C) नई column insert करना
- (D) Row को delete करना
- LibreOffice Impress में ‘Character’ sub-menu किसके लिए उपयोग किया जाता है?
- (A) Text formatting के लिए
- (B) Image formatting के लिए
- (C) Slide formatting के लिए
- (D) Animation के लिए
- ‘Arrange’ मेनू में ‘Send to Back’ विकल्प का क्या कार्य है?
- (A) Object को पीछे भेजना
- (B) Object को सामने लाना
- (C) Object को align करना
- (D) Object को group करना
- ‘Group’ मेनू में ‘Ungroup’ का क्या अर्थ है?
- (A) Object को group करना
- (B) Group किए हुए objects को अलग करना
- (C) Objects को align करना
- (D) Objects को rotate करना
- LibreOffice Impress में ‘Shadow’ विकल्प किस मेनू में पाया जाता है?
- (A) Text
- (B) Crop
- (C) Align
- (D) Arrange
- ‘Format’ मेनू में ‘Cycle Case’ का कार्य क्या है?
- (A) Text के capitalization को cycle में बदलना
- (B) Text को underline करना
- (C) Text को bold करना
- (D) Text को italic करना
- ‘Flip’ मेनू में ‘Horizontally’ विकल्प का क्या कार्य है?
- (A) Object को horizontally flip करना
- (B) Object को vertically flip करना
- (C) Object को rotate करना
- (D) Object को align करना
- ‘Position and Size’ विकल्प किस मेनू में पाया जाता है?
- (A) Text Box and Shape
- (B) Align
- (C) Crop
- (D) Group
- LibreOffice Impress में ‘Lists’ मेनू में ‘Promote’ विकल्प का कार्य क्या है?
- (A) List के level को बढ़ाना
- (B) List के level को घटाना
- (C) List को delete करना
- (D) List को insert करना
- ‘Distribute Selection’ विकल्प किस मेनू में होता है?
- (A) Align Objects
- (B) Arrange
- (C) Crop
- (D) Text Box and Shape
- LibreOffice Impress में ‘Bring to Front’ का कार्य क्या है?
- (A) Object को सामने लाना
- (B) Object को पीछे भेजना
- (C) Object को flip करना
- (D) Object को rotate करना
- ‘Edit with External Tool’ किस sub-menu का हिस्सा है?
- (A) Crop
- (B) Align
- (C) Arrange
- (D) Group
- ‘Minimal Row Height’ विकल्प किस मेनू का हिस्सा है?
- (A) Row and Column Management
- (B) Edit Style
- (C) Shadow
- (D) Group
- ‘Flip’ मेनू में ‘Vertically’ विकल्प का कार्य क्या है?
- (A) Object को vertically flip करना
- (B) Object को horizontally flip करना
- (C) Object को align करना
- (D) Object को group करना
- LibreOffice Impress में ‘Styles’ sub-menu किस मेनू का हिस्सा है?
- (A) Text
- (B) Crop
- (C) Arrange
- (D) Align
- ‘Arrange’ मेनू में ‘To Curve’ विकल्प का क्या कार्य है?
- (A) Object को curve में convert करना
- (B) Object को rotate करना
- (C) Object को flip करना
- (D) Object को align करना
- LibreOffice Impress में ‘Interaction’ विकल्प किस मेनू में पाया जाता है?
- (A) Text
- (B) Align
- (C) Group
- (D) Crop
- ‘Align Objects’ मेनू में ‘Vertically Top’ का क्या अर्थ है?
- (A) Object को vertically top पर align करना
- (B) Object को horizontally top पर align करना
- (C) Object को vertically bottom पर align करना
- (D) Object को horizontally bottom पर align करना
- ‘Table’ sub-menu में ‘Distribute Columns Evenly’ विकल्प का क्या कार्य है?
- (A) Columns को evenly distribute करना
- (B) Rows को evenly distribute करना
- (C) Table को align करना
- (D) Table को merge करना
- LibreOffice Impress में ‘Rotate’ विकल्प किस मेनू में पाया जाता है?
- (A) Align Objects
- (B) Edit Style
- (C) Crop
- (D) Group
- ‘Group’ मेनू में ‘Exit Group’ का कार्य क्या है?
- (A) Group mode से बाहर निकलना
- (B) Group को delete करना
- (C) Group को edit करना
- (D) Group को align करना
- ‘Clear Direct Formatting’ विकल्प किस मेनू में पाया जाता है?
- (A) Text
- (B) Arrange
- (C) Crop
- (D) Group
- ‘Row and Column Management’ मेनू में ‘Insert Column’ का कार्य क्या है?
- (A) नई column insert करना
- (B) नई row insert करना
- (C) Row को delete करना
- (D) Column को delete करना
- LibreOffice Impress में ‘Arrange’ मेनू में ‘To 3D’ का क्या अर्थ है?
- (A) Object को 3D में convert करना
- (B) Object को flip करना
- (C) Object को rotate करना
- (D) Object को group करना
- ‘Text Box and Shape’ मेनू में ‘Area’ विकल्प का कार्य क्या है?
- (A) Object के background को fill करना
- (B) Object को rotate करना
- (C) Object को flip करना
- (D) Object को group करना
- ‘Align’ मेनू में ‘Top’ का कार्य क्या है?
- (A) Object को top पर align करना
- (B) Object को bottom पर align करना
- (C) Object को center में align करना
- (D) Object को middle में align करना
- ‘Convert’ मेनू में ‘To Polygon’ का क्या अर्थ है?
- (A) Object को polygon में convert करना
- (B) Object को flip करना
- (C) Object को rotate करना
- (D) Object को align करना
- ‘Shadow’ विकल्प किस मेनू में होता है?
- (A) Text
- (B) Crop
- (C) Align
- (D) Arrange
- ‘Row and Column Management’ मेनू में ‘Delete Rows’ का कार्य क्या है?
- (A) Rows को delete करना
- (B) Rows को insert करना
- (C) Columns को delete करना
- (D) Columns को insert करना
- LibreOffice Impress में ‘Align Objects’ मेनू में ‘Horizontally Center’ का क्या कार्य है?
- (A) Object को horizontally center पर align करना
- (B) Object को vertically center पर align करना
- (C) Object को top पर align करना
- (D) Object को bottom पर align करना
- ‘Convert’ मेनू में ‘To Bitmap’ का कार्य क्या है?
- (A) Object को bitmap में convert करना
- (B) Object को flip करना
- (C) Object को rotate करना
- (D) Object को group करना
- LibreOffice Impress में ‘Align’ मेनू में ‘Left’ का क्या कार्य है?
- (A) Object को left पर align करना
- (B) Object को right पर align करना
- (C) Object को center में align करना
- (D) Object को top पर align करना
- ‘Group’ मेनू में ‘Enter Group’ का कार्य क्या है?
- (A) Group mode में enter करना
- (B) Group को delete करना
- (C) Group को edit करना
- (D) Group को align करना
- LibreOffice Impress में ‘Rotate’ मेनू में ‘To 3D Rotation Object’ का क्या अर्थ है?
- (A) Object को 3D rotation में convert करना
- (B) Object को flip करना
- (C) Object को rotate करना
- (D) Object को align करना
- ‘Align’ मेनू में ‘Center’ का कार्य क्या है?
- (A) Object को center पर align करना
- (B) Object को top पर align करना
- (C) Object को bottom पर align करना
- (D) Object को left पर align करना
- ‘Text’ मेनू में ‘Lists’ का कार्य क्या है?
- (A) List को insert करना
- (B) List को delete करना
- (C) List को format करना
- (D) उपरोक्त सभी
- LibreOffice Impress में ‘Arrange’ मेनू में ‘Send Backward’ का कार्य क्या है?
- (A) Object को एक step पीछे भेजना
- (B) Object को एक step आगे लाना
- (C) Object को flip करना
- (D) Object को rotate करना
- ‘Character’ मेनू किसके लिए उपयोग किया जाता है?
- (A) Text formatting के लिए
- (B) Slide formatting के लिए
- (C) Image formatting के लिए
- (D) Animation के लिए
- LibreOffice Impress में ‘To Metafile’ विकल्प का कार्य क्या है?
- (A) Object को metafile में convert करना
- (B) Object को flip करना
- (C) Object को rotate करना
- (D) Object को group करना
- ‘Align Objects’ मेनू में ‘Vertically Bottom’ का क्या कार्य है?
- (A) Object को vertically bottom पर align करना
- (B) Object को horizontally bottom पर align करना
- (C) Object को top पर align करना
- (D) Object को center पर align करना
Answers:
- (B) Line Spacing
- (C) Aligns text evenly between left and right margins
- (A) Edit Style
- (B) Ctrl+B
- (A) Row and Column Management
- (A) Original Size
- (A) Text को horizontally center align करता है
- (B) Object की position और size adjust करना
- (D) उपरोक्त सभी
- (A) Numbered list बनाना
- (C) नई column insert करना
- (A) Text formatting के लिए
- (A) Object को पीछे भेजना
- (B) Group किए हुए objects को अलग करना
- (A) Text
- (A) Text के capitalization को cycle में बदलना
- (A) Object को horizontally flip करना
- (A) Text Box and Shape
- (A) List के level को बढ़ाना
- (B) Arrange
- (A) Object को सामने लाना
- (A) Crop
- (A) Row and Column Management
- (A) Object को vertically flip करना
- (A) Text
- (A) Object को curve में convert करना
- (A) Text
- (A) Object को vertically top पर align करना
- (A) Columns को evenly distribute करना
- (A) Align Objects
- (A) Group mode से बाहर निकलना
- (A) Text
- (A) नई column insert करना
- (A) Object को 3D में convert करना
- (A) Object के background को fill करना
- (A) Object को top पर align करना
- (A) Object को polygon में convert करना
- (A) Text
- (A) Rows को delete करना
- (A) Object को horizontally center पर align करना
- (A) Object को bitmap में convert करना
- (A) Object को left पर align करना
- (A) Group mode में enter करना
- (A) Object को 3D rotation में convert करना
- (A) Object को center पर align करना
- (C) List को format करना
- (A) Object को एक step पीछे भेजना
- (A) Text formatting के लिए
- (A) Object को metafile में convert करना
- (A) Object को vertically bottom पर align करना
LibreOffice Impress Format Menu 50 True False in Hindi
- Text option में Spacing sub-menu में किसी भी text के बीच की दूरी को कम या ज्यादा किया जा सकता है।
True / False - Clear Direct Formatting से formatting को हटाया जा सकता है।
True / False - Styles sub-menu में ‘Character’ option नहीं मिलता है।
True / False - Line Spacing sub-menu में Line Spacing: 1.5 का मतलब होता है कि lines के बीच double spacing होगा।
True / False - Alignment sub-menu में Top, Center, और Bottom alignment options होते हैं।
True / False - Ordered List बनाने के लिए, आपको Lists sub-menu का उपयोग करना होगा।
True / False - Update Selected Style option आपको existing style को edit करने में मदद करता है।
True / False - Minimal Row Height option से row की ऊँचाई को minimum पर सेट किया जा सकता है।
True / False - Crop sub-menu में ‘Replace’ option images को बदलने के लिए होता है।
True / False - Text Box and Shape sub-menu में Area option text के background को सेट करने के लिए होता है।
True / False - Align Objects sub-menu में Flip और Rotate options शामिल होते हैं।
True / False - Vertically और Horizontally options Rotate sub-menu में होते हैं।
True / False - To 3D Rotation Object option का उपयोग images को 3D में rotate करने के लिए किया जाता है।
True / False - Arrange sub-menu में Reverse option object के order को उलटने के लिए होता है।
True / False - Group option आपको multiple objects को एक group में combine करने की अनुमति देता है।
True / False - Ungroup option objects को groups में convert करता है।
True / False - Send to Back option किसी object को सभी other objects के पीछे रखने में उपयोग किया जाता है।
True / False - Optimal Row Height option automatically row height को adjust करता है।
True / False - Distribute Columns Evenly option column width को बराबर करने के लिए उपयोग होता है।
True / False - In Front of Object option objects को एक दूसरे के ऊपर रखने में मदद करता है।
True / False - Strikethrough option text को cut through दिखाने के लिए होता है।
True / False - Cycle Case option आपको text का case cycle करने में मदद करता है, जैसे कि uppercase से lowercase।
True / False - Arrange sub-menu में Bring Forward option से object को एक layer आगे लाने के लिए होता है।
True / False - Flip Vertically option से object को vertically उल्टा किया जा सकता है।
True / False - Rotate sub-menu में To Polygon option available होता है।
True / False - Character sub-menu में text के font और style को manage किया जा सकता है।
True / False - Crop Dialog option से image को cut किया जा सकता है।
True / False - Promote option lists में items को ऊपर ले जाने के लिए उपयोग किया जाता है।
True / False - To Metafile option का उपयोग objects को vector graphics में convert करने के लिए होता है।
True / False - Convert sub-menu में To Curve option मिलता है।
True / False - Move Up और Move Down options Ordered List sub-menu में होते हैं।
True / False - Send Backward option object को सिर्फ एक layer पीछे ले जाने के लिए होता है।
True / False - Superscript option text को उपर की ओर small text में convert करता है।
True / False - Optimize Column Width option automatically column की चौड़ाई को optimize करता है।
True / False - Cycle Case option text को capitalize नहीं कर सकता।
True / False - Position and Size option Text Box and Shape sub-menu में available है।
True / False - To 3D Rotation Object का उपयोग 2D objects को 3D में convert करने के लिए किया जाता है।
True / False - Strikethrough option सिर्फ text को underline करता है।
True / False - Align sub-menu में Vertically Top और Horizontally Center options मिलते हैं।
True / False - Optimal Row Height option row height को manually adjust करने की अनुमति देता है।
True / False - To Bitmap option images को bitmap format में convert करता है।
True / False - Edit with External Tool option से image को external tool में edit किया जा सकता है।
True / False - Distribute Selection option Align Objects sub-menu में होता है।
True / False - Minimal Column Width option automatically column की चौड़ाई को minimum पर सेट करता है।
True / False - Character sub-menu में text की formatting options नहीं होती हैं।
True / False - To Curve option images को curve shape में convert करता है।
True / False - Italic option text को italics में convert करता है।
True / False - Arrange sub-menu में Flip Horizontally और Flip Vertically options होते हैं।
True / False - Convert sub-menu में To 3D Rotation Object option नहीं होता है।
True / False - Interaction option text के साथ interaction set करने के लिए होता है।
True / False
Answers
- True
- True
- False
- False
- True
- True
- True
- True
- True
- True
- True
- False
- True
- True
- True
- False
- True
- True
- True
- True
- True
- True
- True
- True
- False
- True
- True
- True
- True
- True
- True
- True
- True
- True
- False
- True
- True
- False
- True
- False
- True
- True
- True
- True
- False
- True
- True
- True
- False
- True
LibreOffice impress Format menu FAQ
1. LibreOffice Impress के Format Menu में Text विकल्प का उपयोग किसलिए किया जाता है?
What is the purpose of the Text option in the Format Menu of LibreOffice Impress?*
Answer: Text विकल्प का उपयोग टेक्स्ट के फॉर्मेटिंग और स्टाइलिंग के लिए किया जाता है, जैसे कि स्पेसिंग, लिस्ट्स, और फॉन्ट्स।
2. Line Spacing विकल्प का उपयोग किसलिए होता है?
What is the use of the Line Spacing option?
Answer: Line Spacing विकल्प का उपयोग पैराग्राफ़ के बीच की लाइन स्पेसिंग को सेट करने के लिए होता है।
3. Alignment में Center विकल्प का क्या कार्य है?
What is the function of the Center option under Alignment?
Answer: Center विकल्प का उपयोग टेक्स्ट या ऑब्जेक्ट को स्लाइड के बीच में संरेखित करने के लिए किया जाता है।
4. Lists में Ordered List और Unordered List में क्या अंतर है?
What is the difference between Ordered List and Unordered List in Lists?
Answer: Ordered List में आइटम्स को संख्याओं या अक्षरों के साथ क्रमबद्ध किया जाता है, जबकि Unordered List में बुलेट्स का उपयोग होता है।
5. Edit Style में Update Selected Style का क्या कार्य है?
What does Update Selected Style do in Edit Style?
Answer: Update Selected Style विकल्प का उपयोग वर्तमान टेक्स्ट या ऑब्जेक्ट के स्टाइल को अपडेट करने के लिए किया जाता है।
6. Row और Column Management में Minimal Row Height का क्या उपयोग है?
What is the use of Minimal Row Height in Row and Column Management?
Answer: Minimal Row Height विकल्प का उपयोग सबसे छोटी पंक्ति की ऊँचाई सेट करने के लिए किया जाता है।
7. Crop विकल्प का उपयोग कब और कैसे किया जाता है?
When and how is the Crop option used?
Answer: Crop विकल्प का उपयोग इमेज के अनावश्यक हिस्सों को हटाने के लिए किया जाता है।
8. Text Box and Shape में Position and Size विकल्प का क्या कार्य है?
What is the function of Position and Size in Text Box and Shape?
Answer: Position and Size विकल्प का उपयोग टेक्स्ट बॉक्स या ऑब्जेक्ट के स्थान और आकार को समायोजित करने के लिए किया जाता है।
9. Align Objects में Rotate विकल्प का उपयोग क्या है?
What is the use of the Rotate option in Align Objects?
Answer: Rotate विकल्प का उपयोग ऑब्जेक्ट को घुमाने के लिए किया जाता है।
10. Arrange में To 3D विकल्प का क्या उपयोग होता है?
What is the use of the To 3D option in Arrange?
Answer: To 3D विकल्प का उपयोग ऑब्जेक्ट को 3D फॉर्मेट में बदलने के लिए किया जाता है।
11. Flip विकल्प में Horizontally और Vertically के बीच क्या अंतर है?
What is the difference between Horizontally and Vertically in Flip?
Answer: Horizontally विकल्प ऑब्जेक्ट को क्षैतिज दिशा में पलटता है, जबकि Vertically विकल्प उसे ऊर्ध्वाधर दिशा में पलटता है।
12. Align विकल्प में Horizontally Center और Vertically Center का क्या कार्य है?
What is the function of Horizontally Center and Vertically Center in Align?
Answer: Horizontally Center का उपयोग ऑब्जेक्ट को स्लाइड के केंद्र में क्षैतिज रूप से संरेखित करने के लिए किया जाता है, जबकि Vertically Center का उपयोग उसे ऊर्ध्वाधर रूप से केंद्र में संरेखित करने के लिए किया जाता है।
13. Order विकल्प में Bring to Front और Send to Back का क्या कार्य है?
What is the function of Bring to Front and Send to Back in Order?
Answer: Bring to Front विकल्प ऑब्जेक्ट को अन्य सभी ऑब्जेक्ट्स के सामने लाता है, जबकि Send to Back विकल्प उसे सभी ऑब्जेक्ट्स के पीछे भेजता है।
14. Group और Ungroup विकल्प का क्या उपयोग होता है?
What is the use of Group and Ungroup options?
Answer: Group विकल्प का उपयोग कई ऑब्जेक्ट्स को एक साथ ग्रुप करने के लिए किया जाता है ताकि वे एक इकाई की तरह कार्य करें। Ungroup का उपयोग ग्रुप को अलग करने के लिए किया जाता है।
15. Arrange में To Curve विकल्प का क्या उपयोग है?
What is the use of To Curve option in Arrange?
Answer: To Curve विकल्प का उपयोग ऑब्जेक्ट को कर्व में बदलने के लिए किया जाता है ताकि उसे अधिक फ्लेक्सिबल रूप से एडिट किया जा सके।
16. Text Box and Shape में Line विकल्प का क्या कार्य है?
What is the function of the Line option in Text Box and Shape?
Answer: Line विकल्प का उपयोग ऑब्जेक्ट की बाहरी बॉर्डर या रेखा की शैली और रंग को एडिट करने के लिए किया जाता है।
17. Row और Column Management में Merge Cells का क्या उपयोग होता है?
What is the use of Merge Cells in Row and Column Management?
Answer: Merge Cells विकल्प का उपयोग कई सेल्स को एक बड़े सेल में मर्ज करने के लिए किया जाता है।
18. Format Menu में Shadow विकल्प का क्या उपयोग है?
What is the use of the Shadow option in the Format Menu?
Answer: Shadow विकल्प का उपयोग ऑब्जेक्ट्स या टेक्स्ट के पीछे शैडो इफेक्ट जोड़ने के लिए किया जाता है ताकि वे और अधिक उभरकर दिखें।
19. Interaction विकल्प का उपयोग किस लिए किया जाता है?
What is the purpose of the Interaction option?
Answer: Interaction विकल्प का उपयोग स्लाइड शो के दौरान ऑब्जेक्ट्स के इंटरैक्टिव बिहेवियर को सेट करने के लिए किया जाता है, जैसे हाइपरलिंक्स या एक्शन बटन।
20. Arrange में Reverse विकल्प का क्या कार्य है?
What is the function of the Reverse option in Arrange?
Answer: Reverse विकल्प का उपयोग ऑब्जेक्ट्स के ऑर्डर को रिवर्स करने के लिए किया जाता है, जिससे उनके आगे और पीछे के स्थानों की अदला-बदली होती है।
21. Group में Enter Group और Exit Group का क्या उपयोग है?
What is the use of Enter Group and Exit Group in Group?
Answer: Enter Group विकल्प का उपयोग ग्रुप में जाने और उसमें एडिटिंग करने के लिए किया जाता है। Exit Group का उपयोग ग्रुप से बाहर निकलने के लिए होता है।
22. Row और Column Management में Distribute Rows Evenly का क्या कार्य है?
What is the function of Distribute Rows Evenly in Row and Column Management?
Answer: Distribute Rows Evenly विकल्प का उपयोग सभी चुनी गई पंक्तियों को समान ऊँचाई में विभाजित करने के लिए किया जाता है।
23. Arrange में To Bitmap का क्या कार्य है?
What is the function of To Bitmap in Arrange?
Answer: To Bitmap विकल्प का उपयोग ऑब्जेक्ट को बिटमैप इमेज में बदलने के लिए किया जाता है, जिससे वह पिक्सल के आधार पर एडिटेबल बनता है।
24. Align Objects में Flip विकल्प का क्या कार्य है?
What is the function of the Flip option in Align Objects?
Answer: Flip विकल्प का उपयोग ऑब्जेक्ट्स को उनकी मौजूदा दिशा के विपरीत दिशा में पलटने के लिए किया जाता है।
25. Crop Dialog विकल्प का क्या कार्य है?
What is the function of the Crop Dialog option?
Answer: Crop Dialog विकल्प का उपयोग एक विस्तृत इंटरफेस खोलने के लिए किया जाता है जहाँ इमेज को काटने के एडवांस्ड ऑप्शंस उपलब्ध होते हैं।
26. Table में Optimal Column Width का क्या उपयोग है?
What is the use of Optimal Column Width in Table?
Answer: Optimal Column Width विकल्प का उपयोग टेबल में कॉलम की चौड़ाई को ऑटोमैटिक रूप से सेट करने के लिए किया जाता है ताकि उसका कंटेंट सबसे बेहतर तरीके से फिट हो सके।
27. Align Objects में Distribute Selection का क्या कार्य है?
What is the function of Distribute Selection in Align Objects?
Answer: Distribute Selection विकल्प का उपयोग चुनी गई ऑब्जेक्ट्स को समान दूरी पर व्यवस्थित करने के लिए किया जाता है।
28. Format Menu में Name और Description का उपयोग किसलिए होता है?
What is the use of Name and Description in the Format Menu?
Answer: Name और Description विकल्प का उपयोग ऑब्जेक्ट्स को पहचानने और उनके बारे में जानकारी जोड़ने के लिए किया जाता है।
29. Character विकल्प का उपयोग किसलिए किया जाता है?
What is the purpose of the Character option?
Answer: Character विकल्प का उपयोग टेक्स्ट के फॉन्ट, आकार, रंग, और अन्य फॉर्मेटिंग को एडिट करने के लिए किया जाता है।
30. Arrange में To Polygon विकल्प का क्या उपयोग होता है?
What is the use of the To Polygon option in Arrange?
Answer: To Polygon विकल्प का उपयोग ऑब्जेक्ट को पॉलीगॉन में बदलने के लिए किया जाता है, जिससे वह सरल ज्यामितीय आकार में बदलता है।
LibreOffice Impress Format Menu शॉर्टकट्स
- नया स्लाइड जोड़ना
- Ctrl + M
- स्लाइड को डुप्लिकेट करना
- Ctrl + D
- स्लाइड की व्यवस्था बदलना
- Ctrl + Shift + Up/Down Arrow (स्लाइड की स्थिति ऊपर/नीचे करने के लिए)
- स्लाइड के आकार को बदलना
- Ctrl + Shift + P
- ऑब्जेक्ट की विशेषताएँ कॉपी करना
- Ctrl + Shift + C
- ऑब्जेक्ट की विशेषताएँ पेस्ट करना
- Ctrl + Shift + V
- पृष्ठभूमि बदलना
- Ctrl + Shift + B
- लाइन और बॉर्डर के स्वरूप को बदलना
- Ctrl + 1
- ऑब्जेक्ट को ग्रुप करना
- Ctrl + Shift + G
- ऑब्जेक्ट को अनग्रुप करना
- Ctrl + Shift + U
- ऑब्जेक्ट की स्थिति को संरेखित करना
- Ctrl + E (केंद्र में संरेखित करने के लिए)
- Ctrl + L (बाईं ओर संरेखित करने के लिए)
- Ctrl + R (दाईं ओर संरेखित करने के लिए)
- टेक्स्ट फॉर्मेटिंग
- Ctrl + T (टेक्स्ट बॉक्स के स्वरूप को बदलने के लिए)
- फॉन्ट का आकार बढ़ाना
- Ctrl + Shift + >
- फॉन्ट का आकार घटाना
- Ctrl + Shift + <
- फॉन्ट को बोल्ड करना
- Ctrl + B
- फॉन्ट को इटैलिक बनाना
- Ctrl + I
- फॉन्ट को अंडरलाइन करना
- Ctrl + U
- स्टाइल्स और स्वरूप का पैनल खोलना
- F11
- स्लाइड ट्रांजिशन सेट करना
- Ctrl + Shift + T
- एनिमेशन सेट करना
- Ctrl + Shift + A
- स्लाइड के विषय को समायोजित करना
- Alt + Shift + F
- स्लाइड को छिपाना
- Ctrl + Shift + H
- स्लाइड की नोट्स देखना
- Ctrl + Shift + N
- स्लाइड को प्रिंट करना
- Ctrl + P
- स्लाइड शो शुरू करना
- F5
- स्लाइड शो रोकना
- Esc
- स्लाइड का आकार बदलना
- Ctrl + Shift + S
- स्लाइड के टेक्स्ट को चिह्नित करना
- Ctrl + A
- आब्जेक्ट को सामने लाना
- Ctrl + Shift + F
- आब्जेक्ट को पीछे लाना
- Ctrl + Shift + B
- फॉर्मेट मेनू खोलना
- Alt + O
- ऑब्जेक्ट की छाया बदलना
- Ctrl + Shift + Y
- ऑब्जेक्ट के रंग को बदलना
- Ctrl + Shift + C
- स्लाइड का ओरिएंटेशन बदलना
- Ctrl + Shift + O
- स्लाइड में चित्र जोड़ना
- Ctrl + Shift + I
Conclusion
हमने इस पोस्ट में LibreOffice Impress Format Menu के सभी महत्वपूर्ण पहलुओं को विस्तार से बताया है, जिसमें MCQs, True/False प्रश्न, FAQs, और शॉर्टकट्स शामिल हैं, जो CCC और अन्य प्रतियोगी परीक्षाओं के लिए अत्यंत सहायक हैं। इस जानकारी को ध्यान में रखते हुए, आप अपनी तैयारी को और भी सशक्त बना सकते हैं। अगर आपको इस विषय पर कोई सवाल है, तो कृपया टिप्पणी में पूछें। पोस्ट को लाइक, सब्सक्राइब और शेयर जरूर करें ताकि आपके दोस्तों और अन्य लोगों को भी इस उपयोगी जानकारी का लाभ मिले। LibreOffice Impress Format Menu के बारे में और अधिक जानने के लिए हमें फॉलो करें।